click map Home Tutorials About FAQ

Wednesday, June 22, 2011

Pillowfight for a Cause

Ladybird LnYou may have heard some of the bloggy buzz about the ladies over at Landybird Lane. Right now they're hosting a "pillowfight" where you can link up any pillow related post from your blog. For each link you add they're asking that you donate a homemade pillowcase. You can donate the pillowcase to a local hospital or women's shelter or you can send it in to them. If you send your pillowcase to them, they'll give it to their friend, Malynn, to donate to Primary Childrens Hospital in Salt Lake City.

Malynn is the mastermind behind this idea. She's 14 years old and a talented seamstress. She's been in and out of the hospital for the past 6 months and had a homemade pillowcase at the hospital with her. To brighten up the rooms of other patients and give them a more home-ey feel, they're hoping to get 100 pillowcases for Malynn to donate.

To help out with the cause, I made these two pillowcases.


I made the light pink and dark green stripes out of 1/2" double fold bias tape that I opened to 1" and ironed flat.


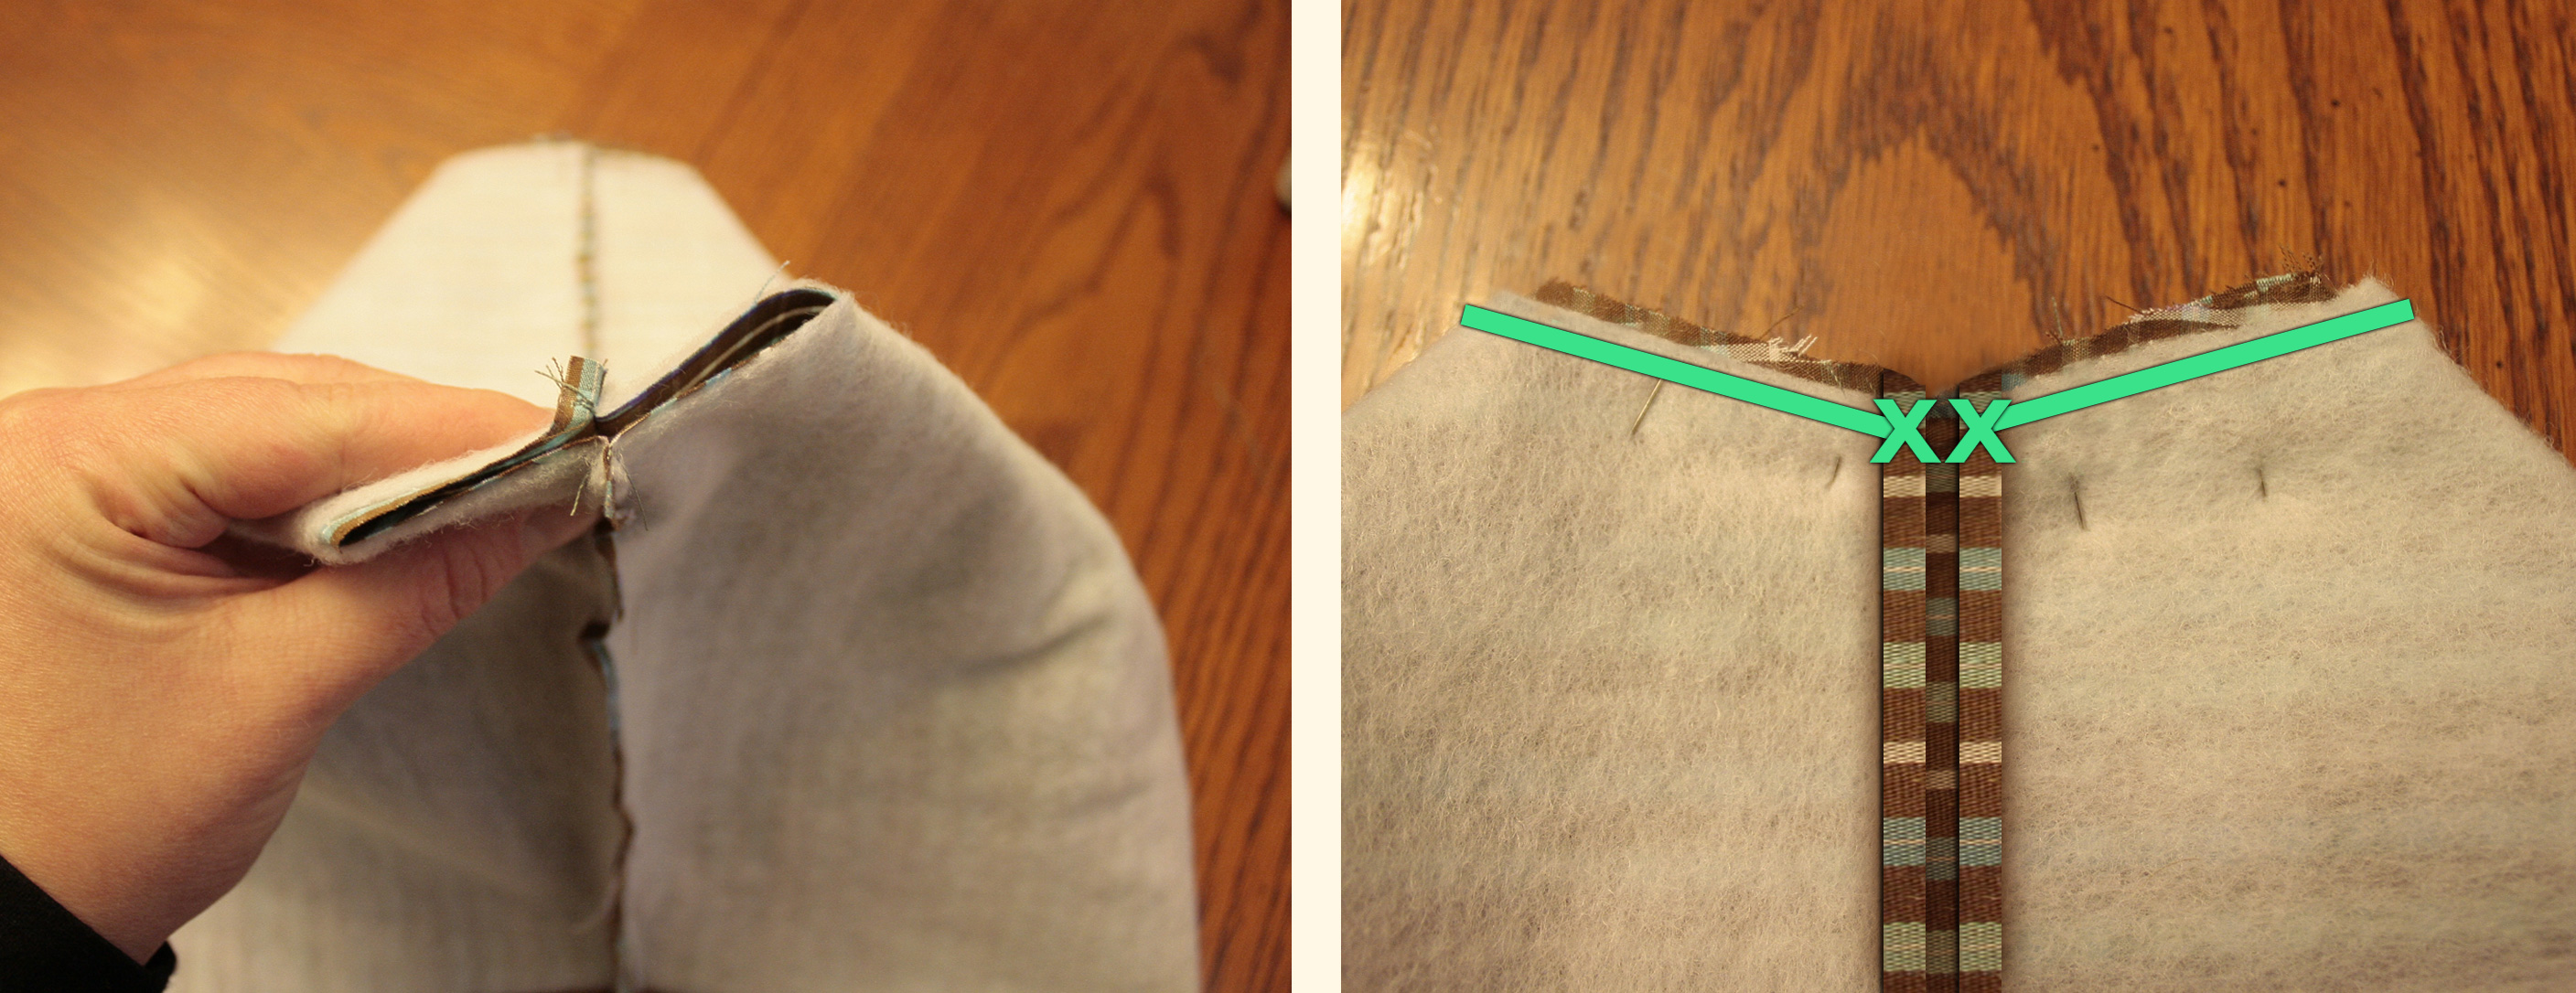
The edge of the pillow is made from a 10" strip that I folded in half so you would still see finished material from the pillow opening. Below you can see the inside (left) and the outside (right) of the edge of the pillow. I was able to hide some of the seams under the bias tape and any exposed raw edges I stitched up with my overcast foot to avoid fraying.


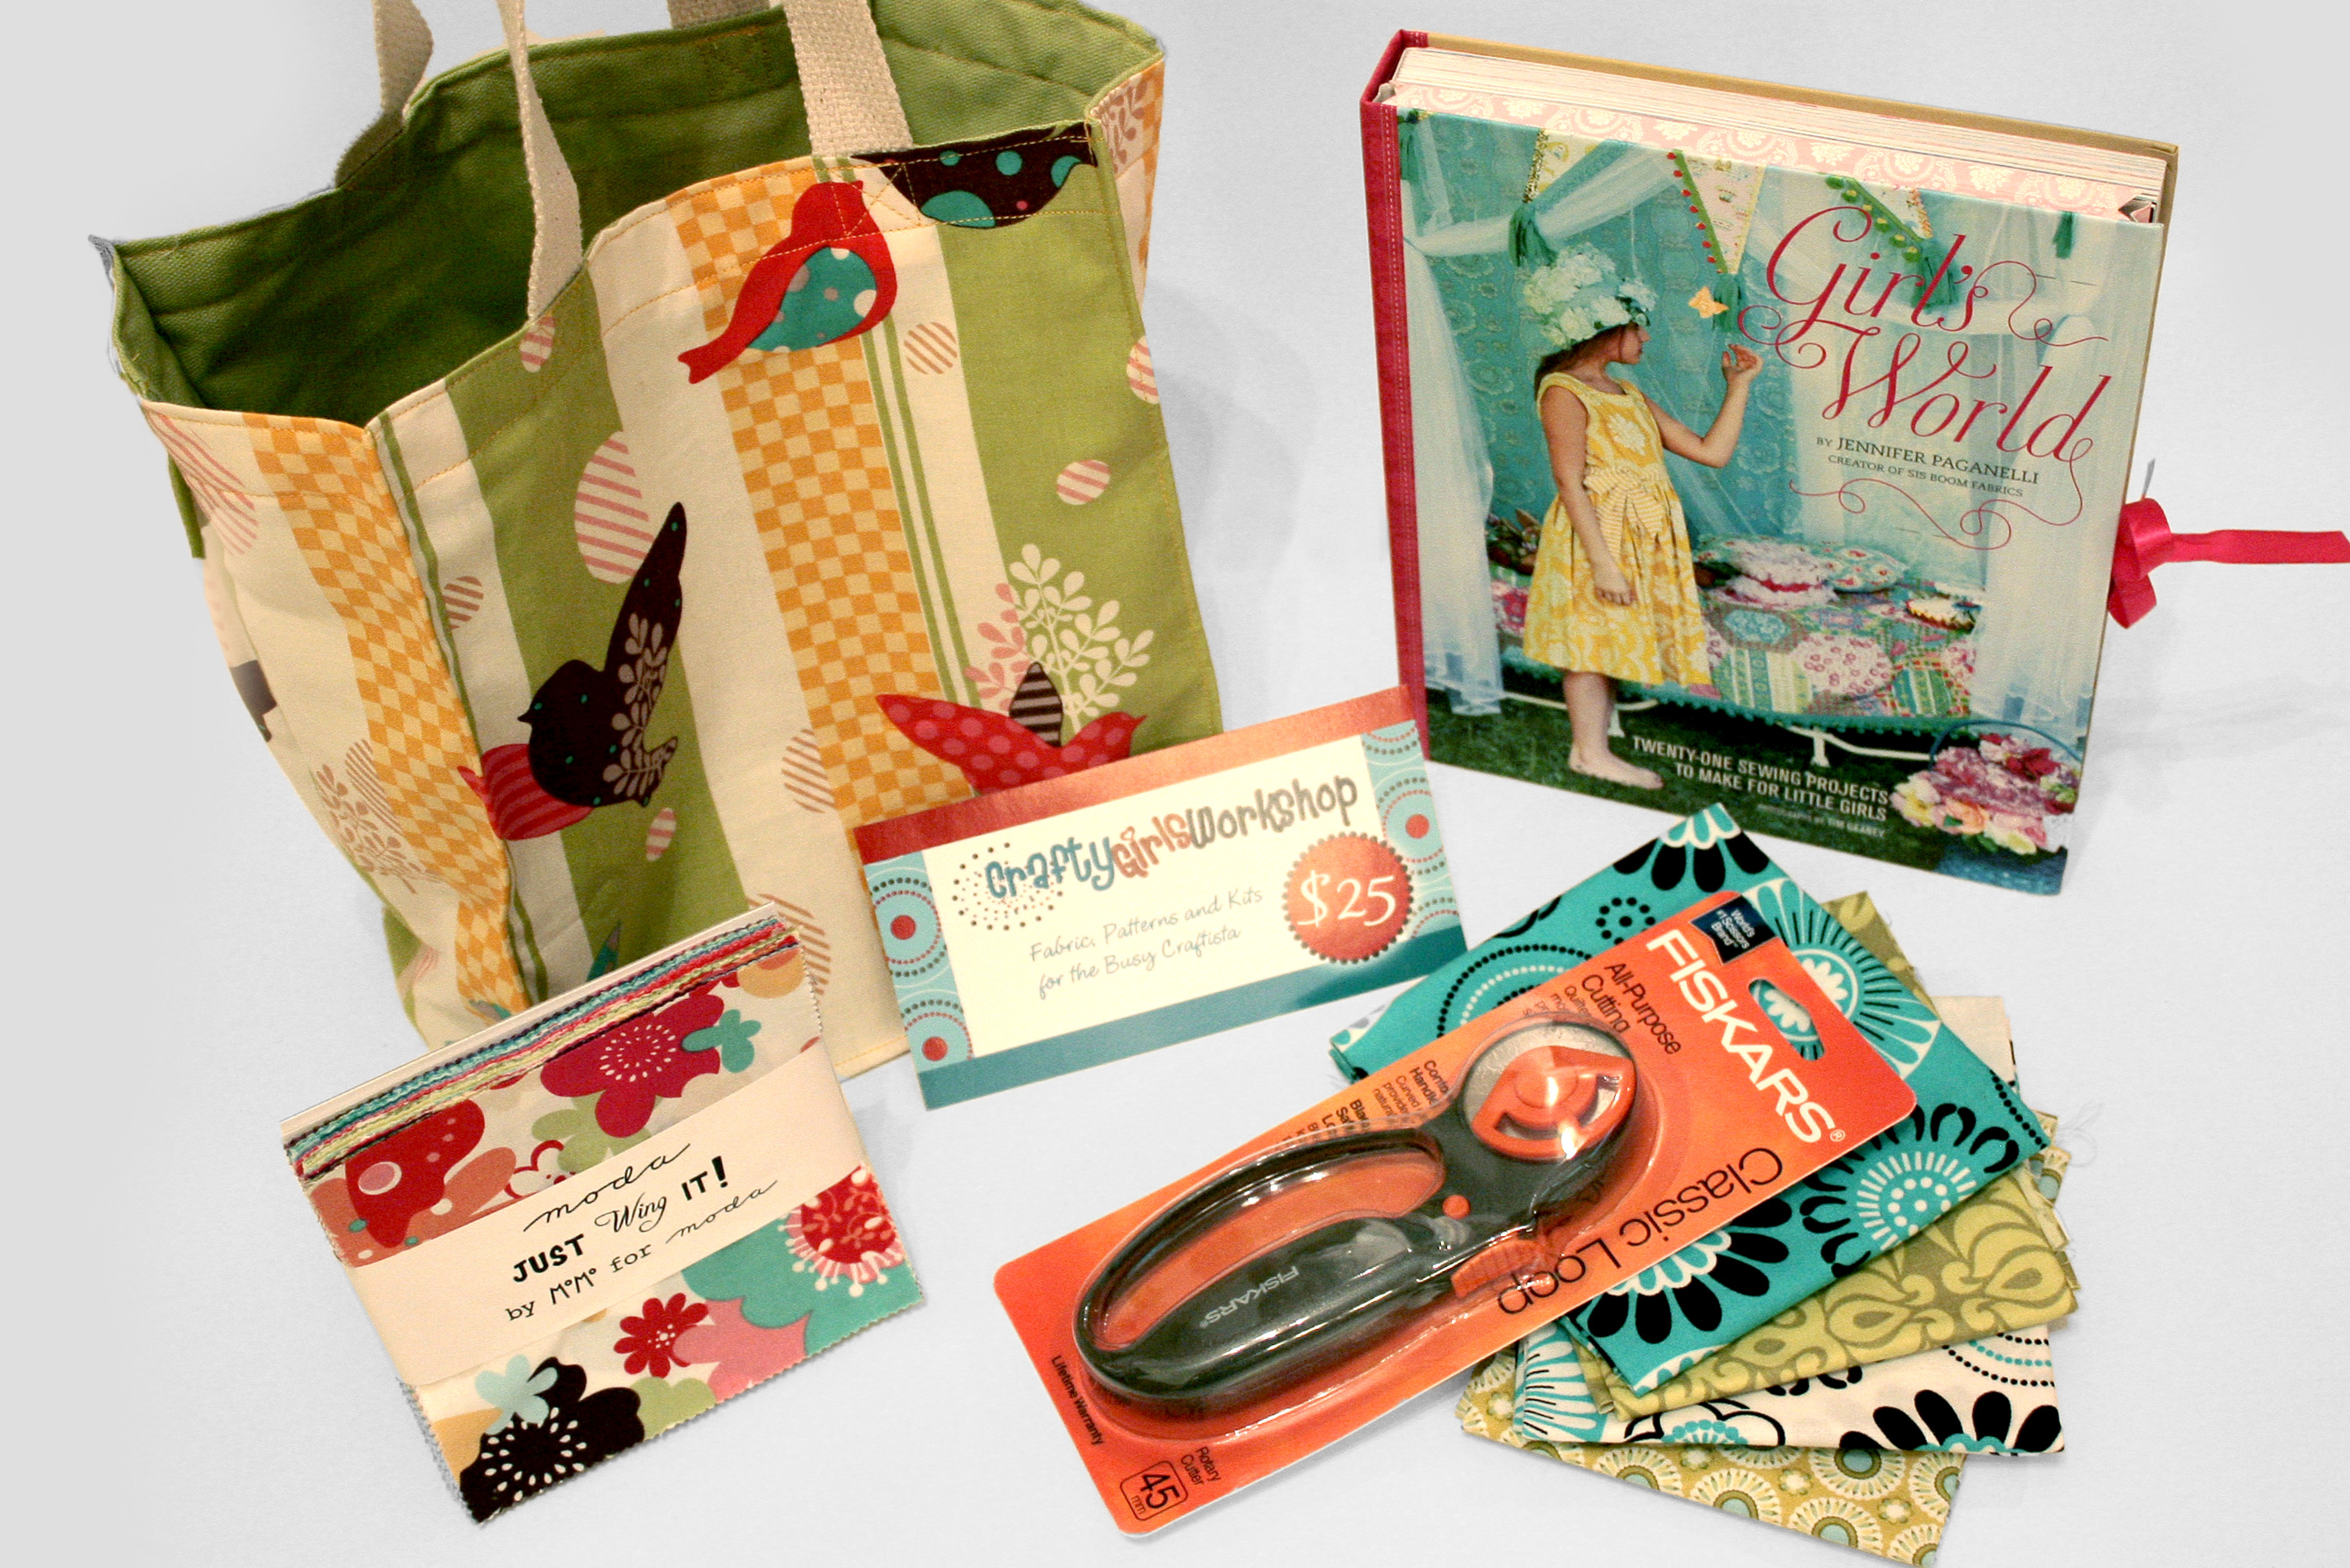
They're also giving away some amazing prizes as part of the pillowfight! They're accepting entries through midnight tonight here.


Tuesday, May 31, 2011

Upcycle: Shirt to Purse


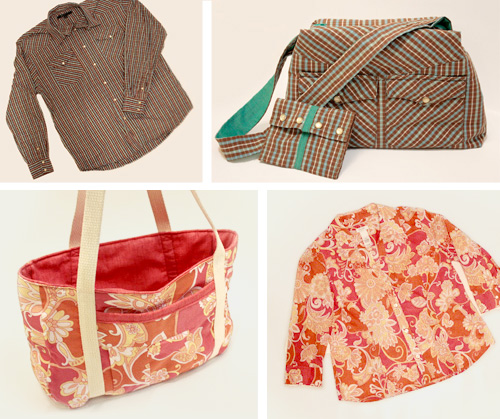
Some of you may recognize the top shirt/purse as my final project from One Month to Win It, a sewing/crafting contest that I won in April! I love the little details in clothing so I used those details in my purse patterns. You can find the pattern for the pink shirt/tote over at Craft Buds. I've uploaded a free PDF pattern* for this purse here. The pattern is 2 pages. You'll want to print both pages out, line up the dots and tape them together. For some reason, in my browser the PDF preview shows the pages are cropped but once I download it, it shows correctly.

For this bag you'll need:
  • one long-sleeved western style shirt
  • 1/2 yard fusible fleece
  • 1/2 yard fabric for the liner (I used a heavier weight home dec fabric)
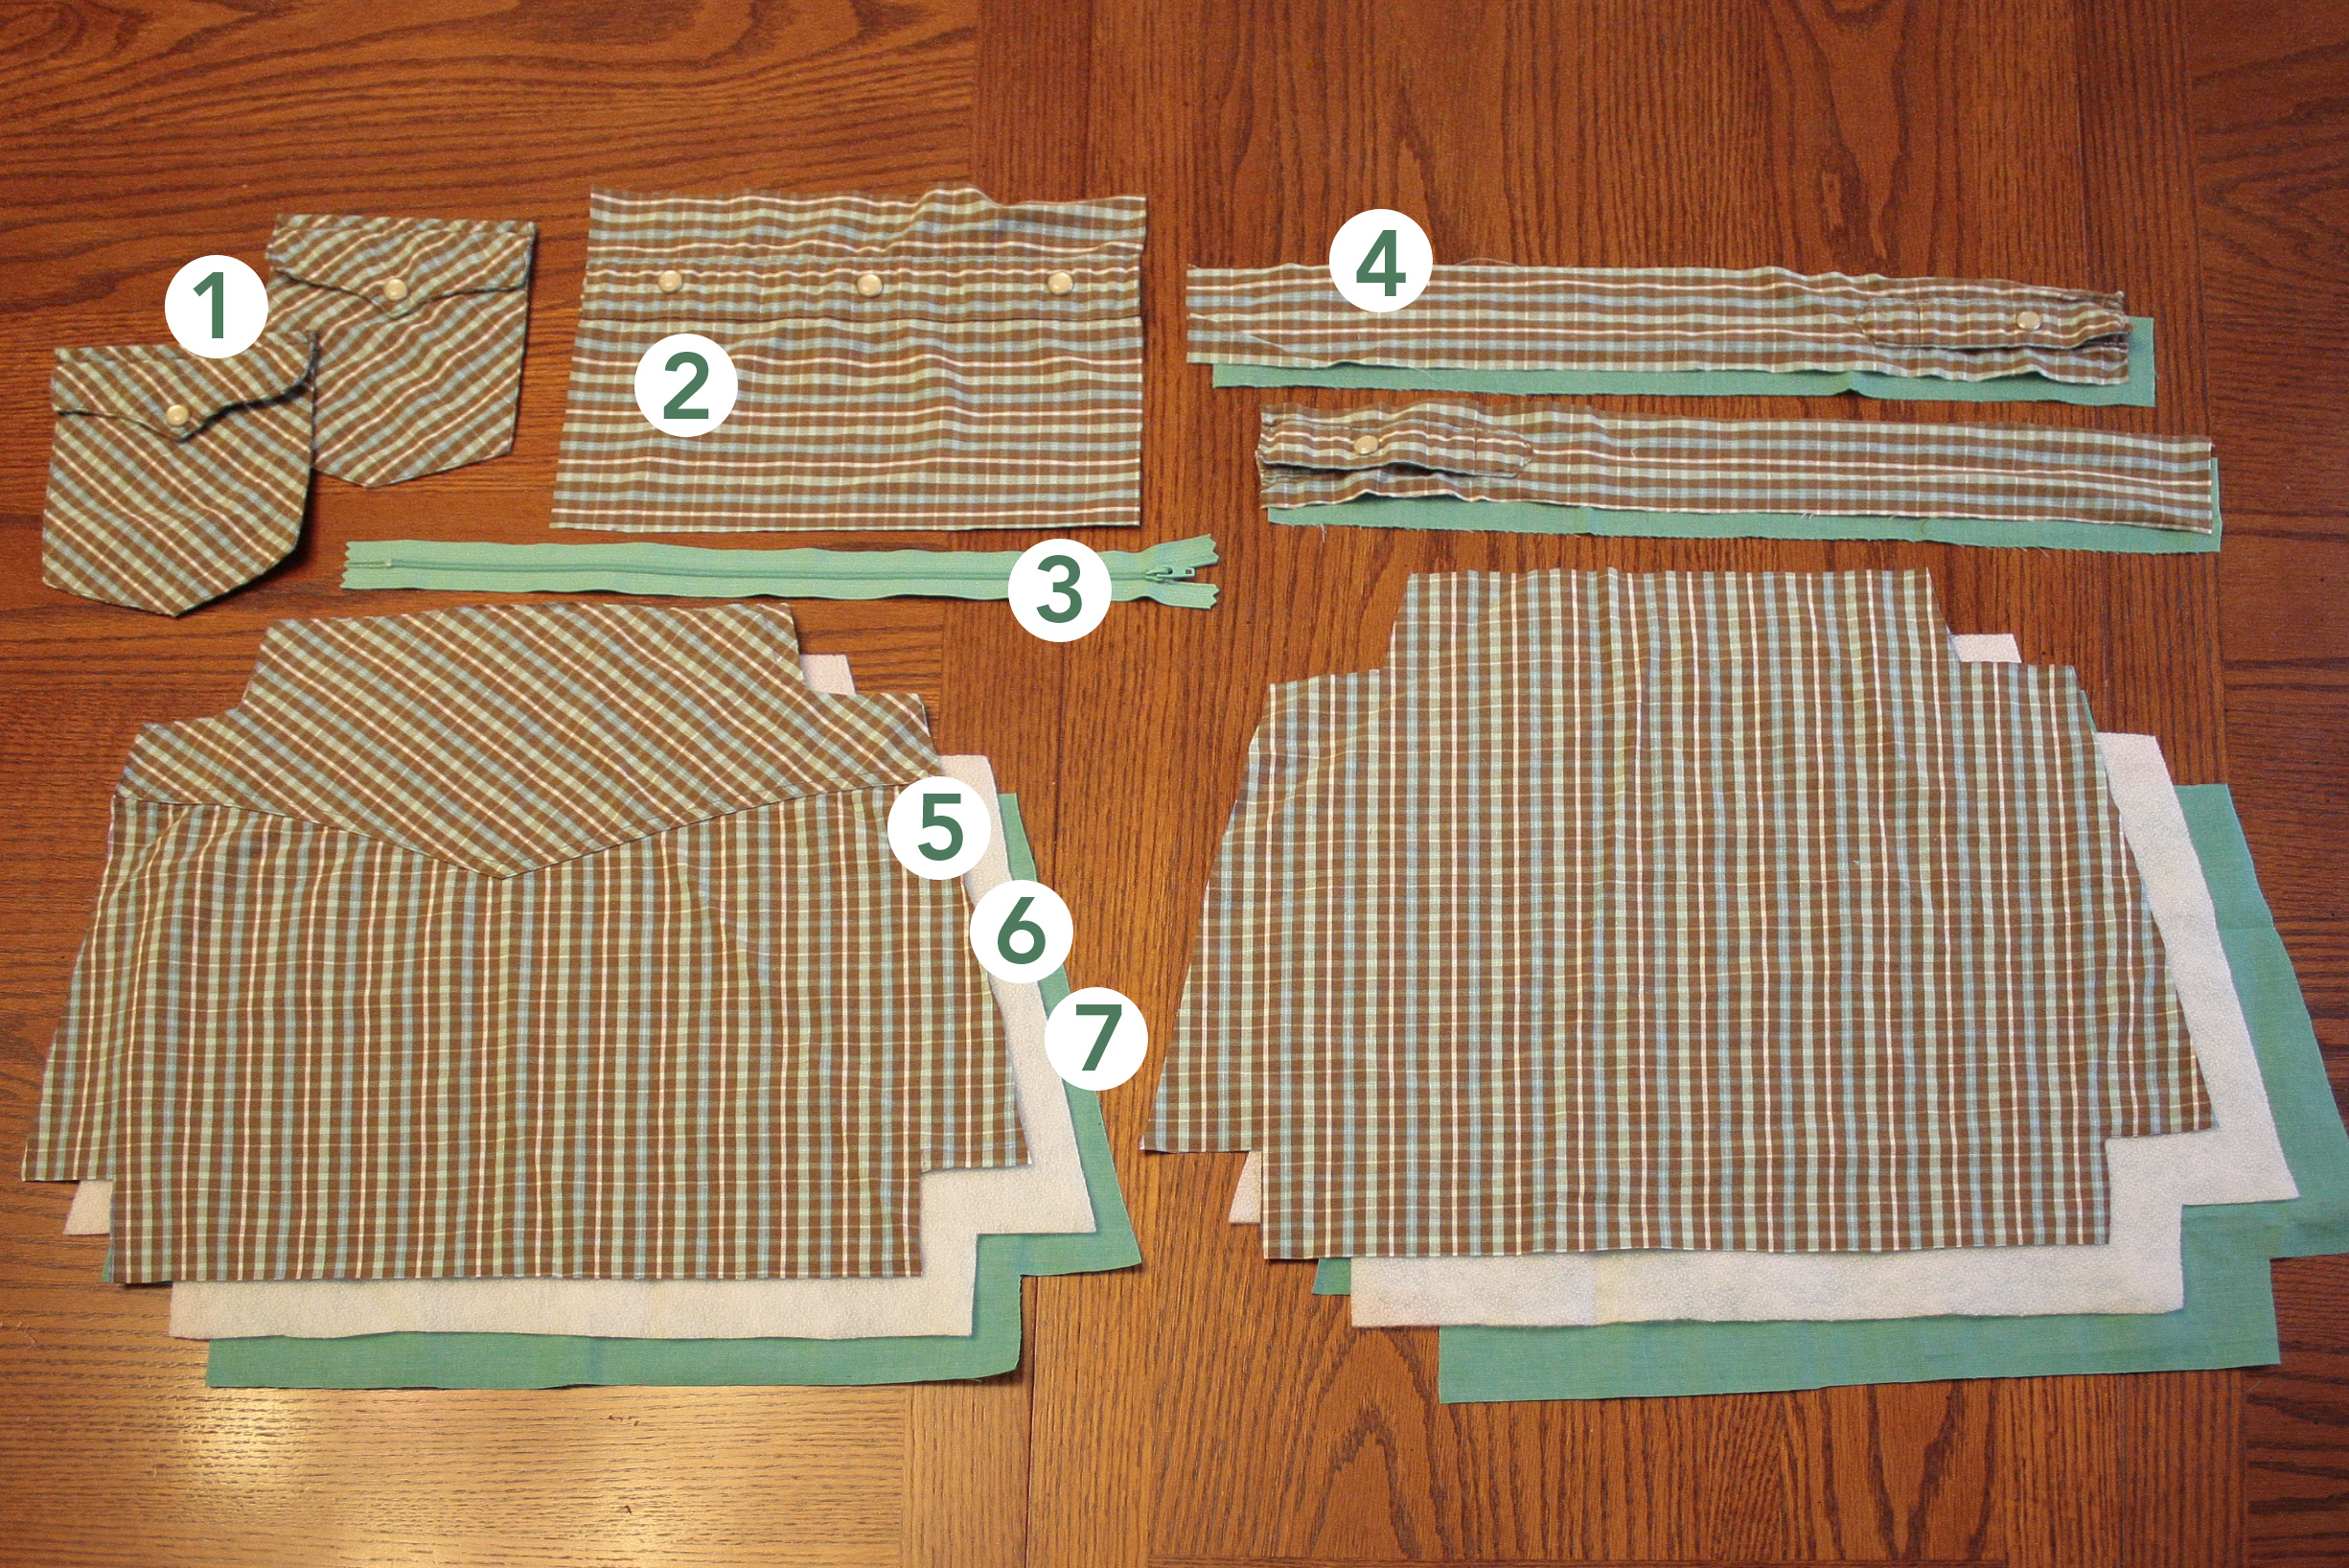
To get started, assemble all the pieces in the photo below including:
  1. Two pockets from the front of the shirt
  2. A 6 1/2" x 9 1/2" rectangle for the inner fabric including the buttons from the front of the shirt
  3. 12" (or longer) zipper
  4. Four strips total of 18" x 2 1/2" fabric, one strip cut from each of the two shirt sleeves including the button, and two strips from the liner fabric. (Using these measurements, the final sewn and attached strap will be around 34" long x 2" wide so feel free to adjust as necessary if you'd like a different length/width. If you're using a lighter weight fabric shirt and/or liner, you may want to add strips of the fusible fleece to the inside of the strap for extra reinforcement.)
  5. Use the pattern to cut pieces from the top back and lower back of the shirt for the main body of the bag.
  6. Use the pattern to cut two pieces of fusible fleece.
  7. Use the pattern to cut two pieces of the liner fabric.
  8. Save the cuffs for a wallet (pictured near the end of the post).

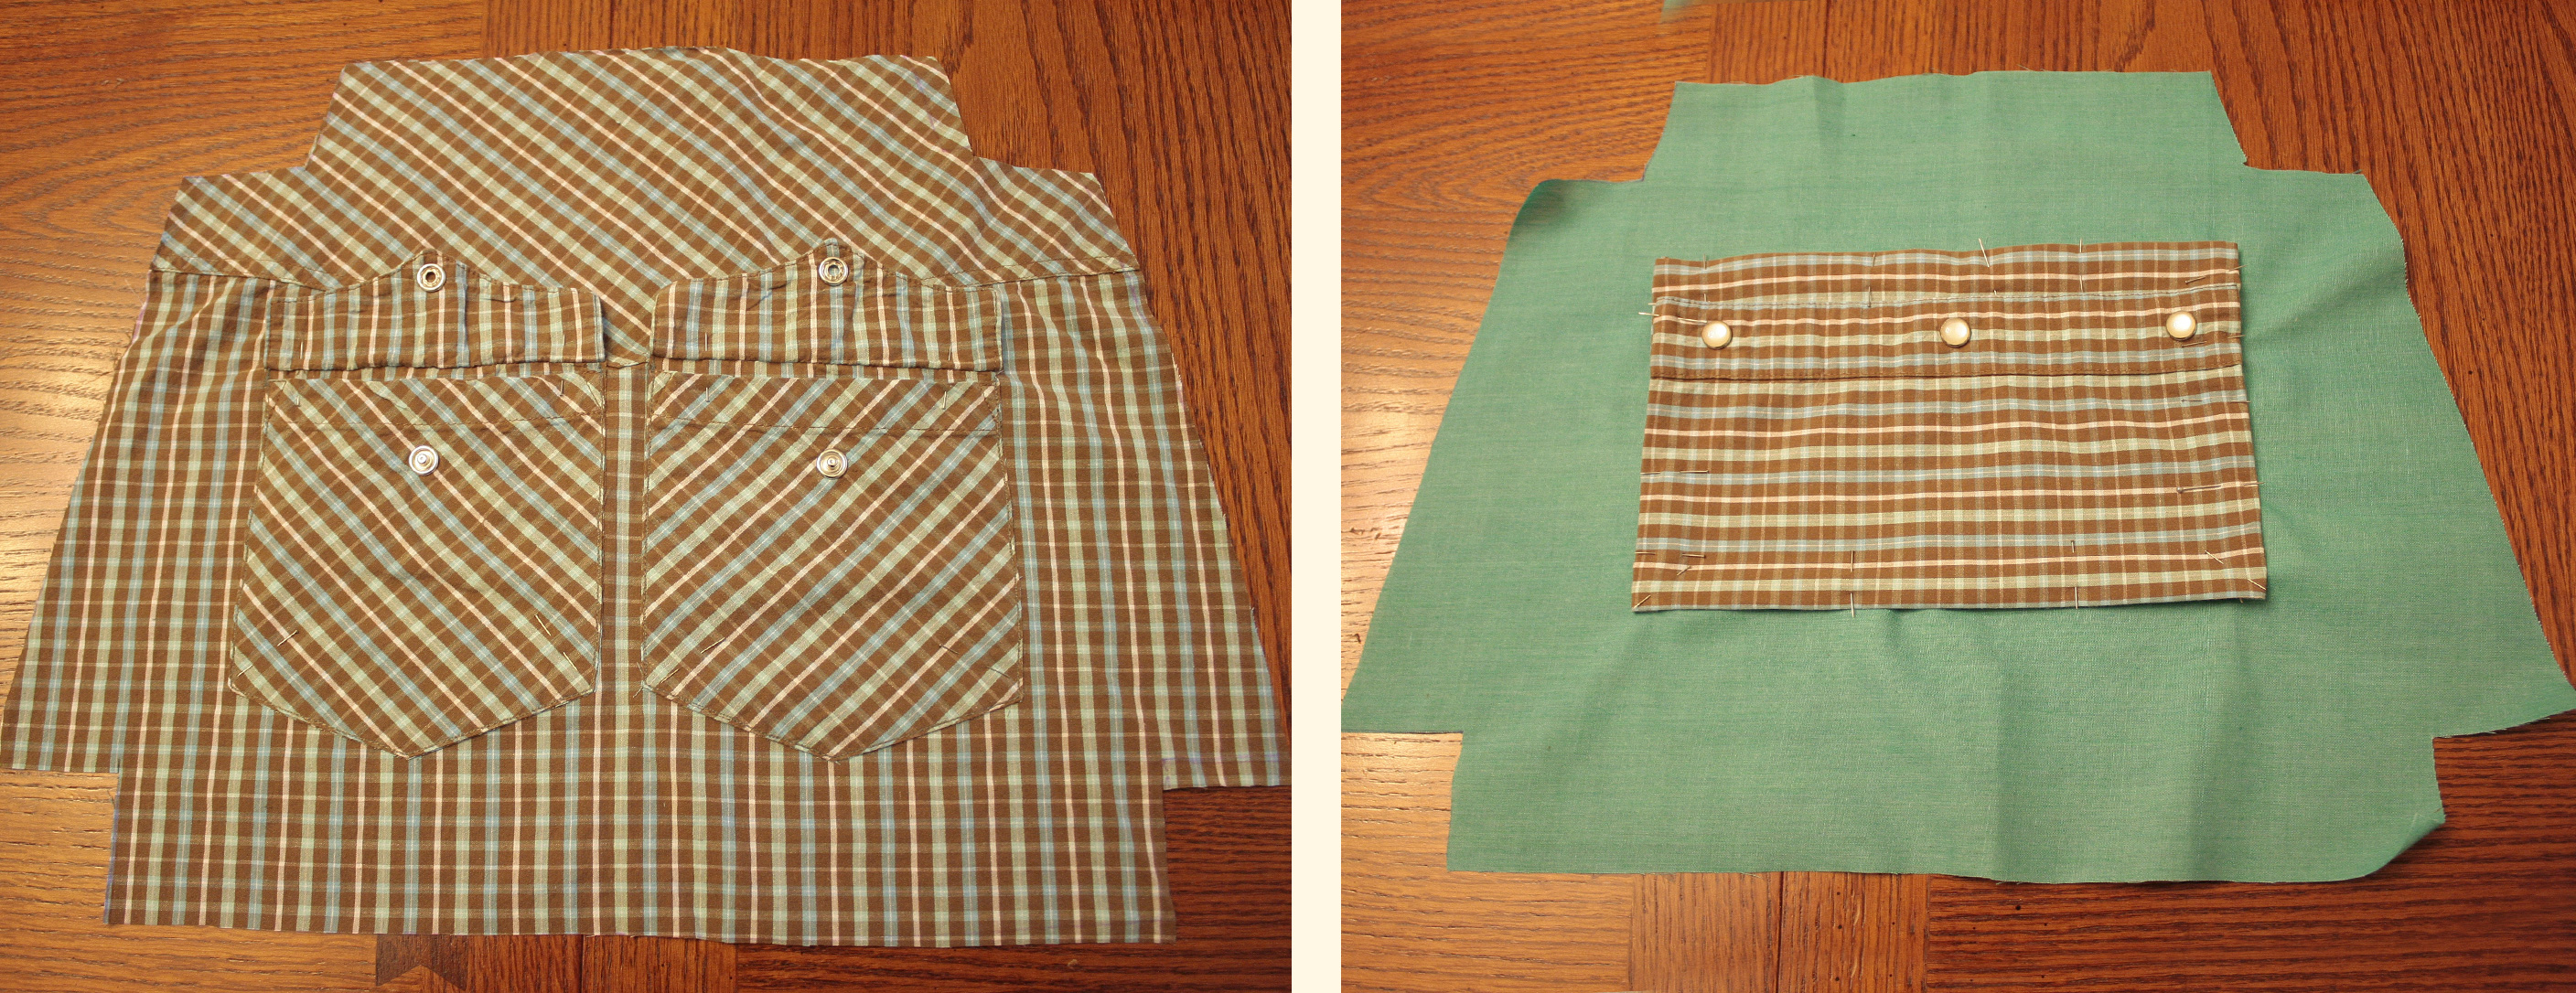
First you'll get the pockets ready. Sew the pockets to one of the exterior pieces (left photo). I sewed across the top, then pinned the flaps up and sewed the sides and bottom. For the inner pocket (right photo), hem the edges of the rectangle and sew it to one of the pieces of fabric for the liner.


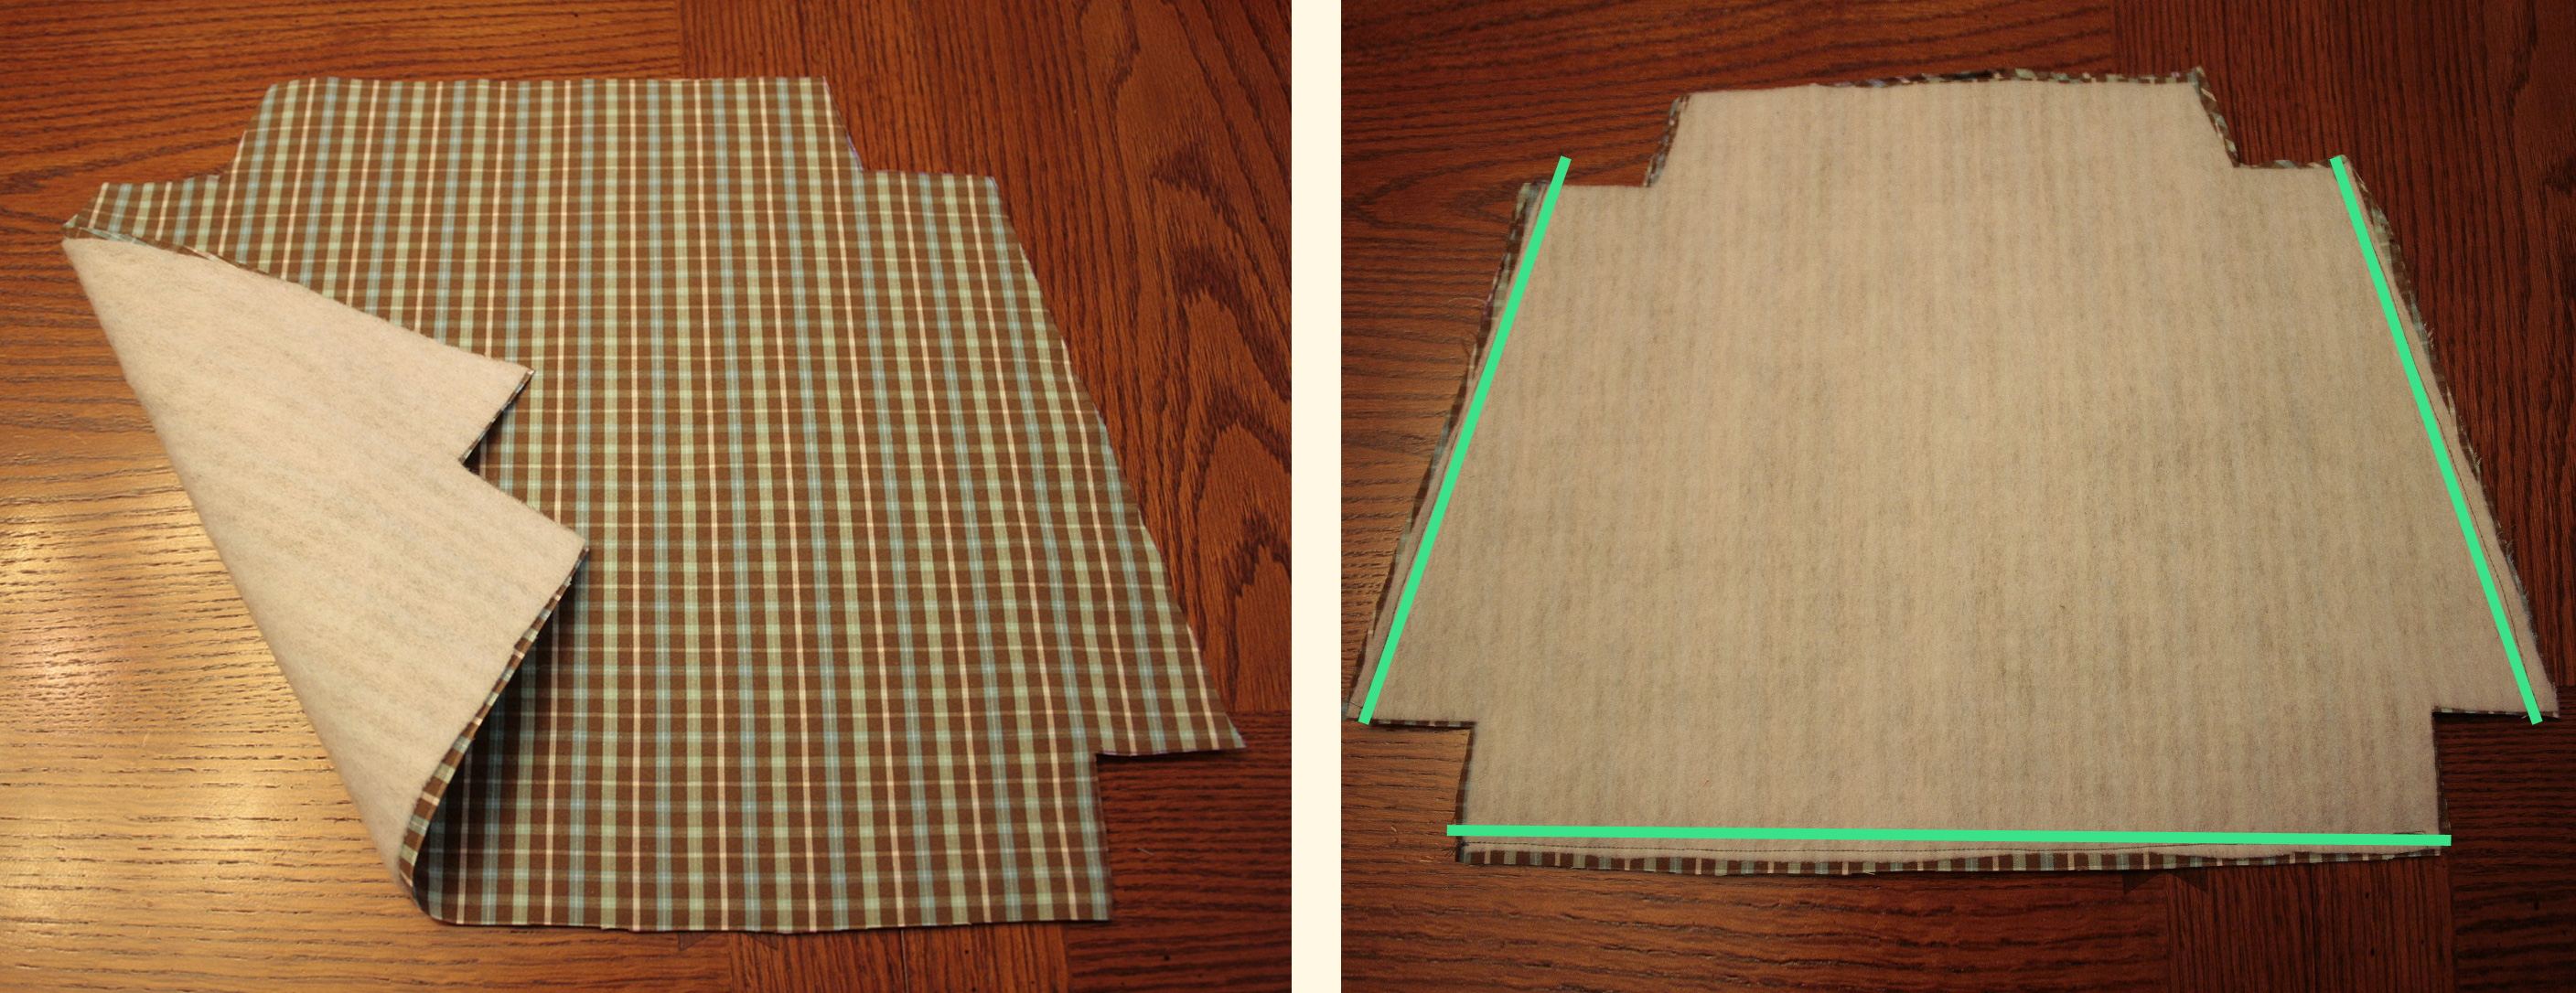
Iron the fusible fleece to the shirt fabric. Iron the top of the piece down 3/8" to help later with the zipper installation. It's optional if you want to stitch it down.

Then with right sides together sew the bottom and sides shut.


Then pinch together the bottom corners (left photo below) and sew them shut. Pinch together the top corners (right photo below) and sew together, sewing down your folded or hemmed edges from the step above and leaving a 1/4" gap where you'll be adding the zipper soon.


Follow the same instructions for the liner. Then nestle the liner inside the outer pieces. Now pin the zipper in place between the two layers and stitch along the sides using your zipper foot. (The left photo below shows raw edges, but in your version you should have either ironed or stitched the raw edge two steps ago.)


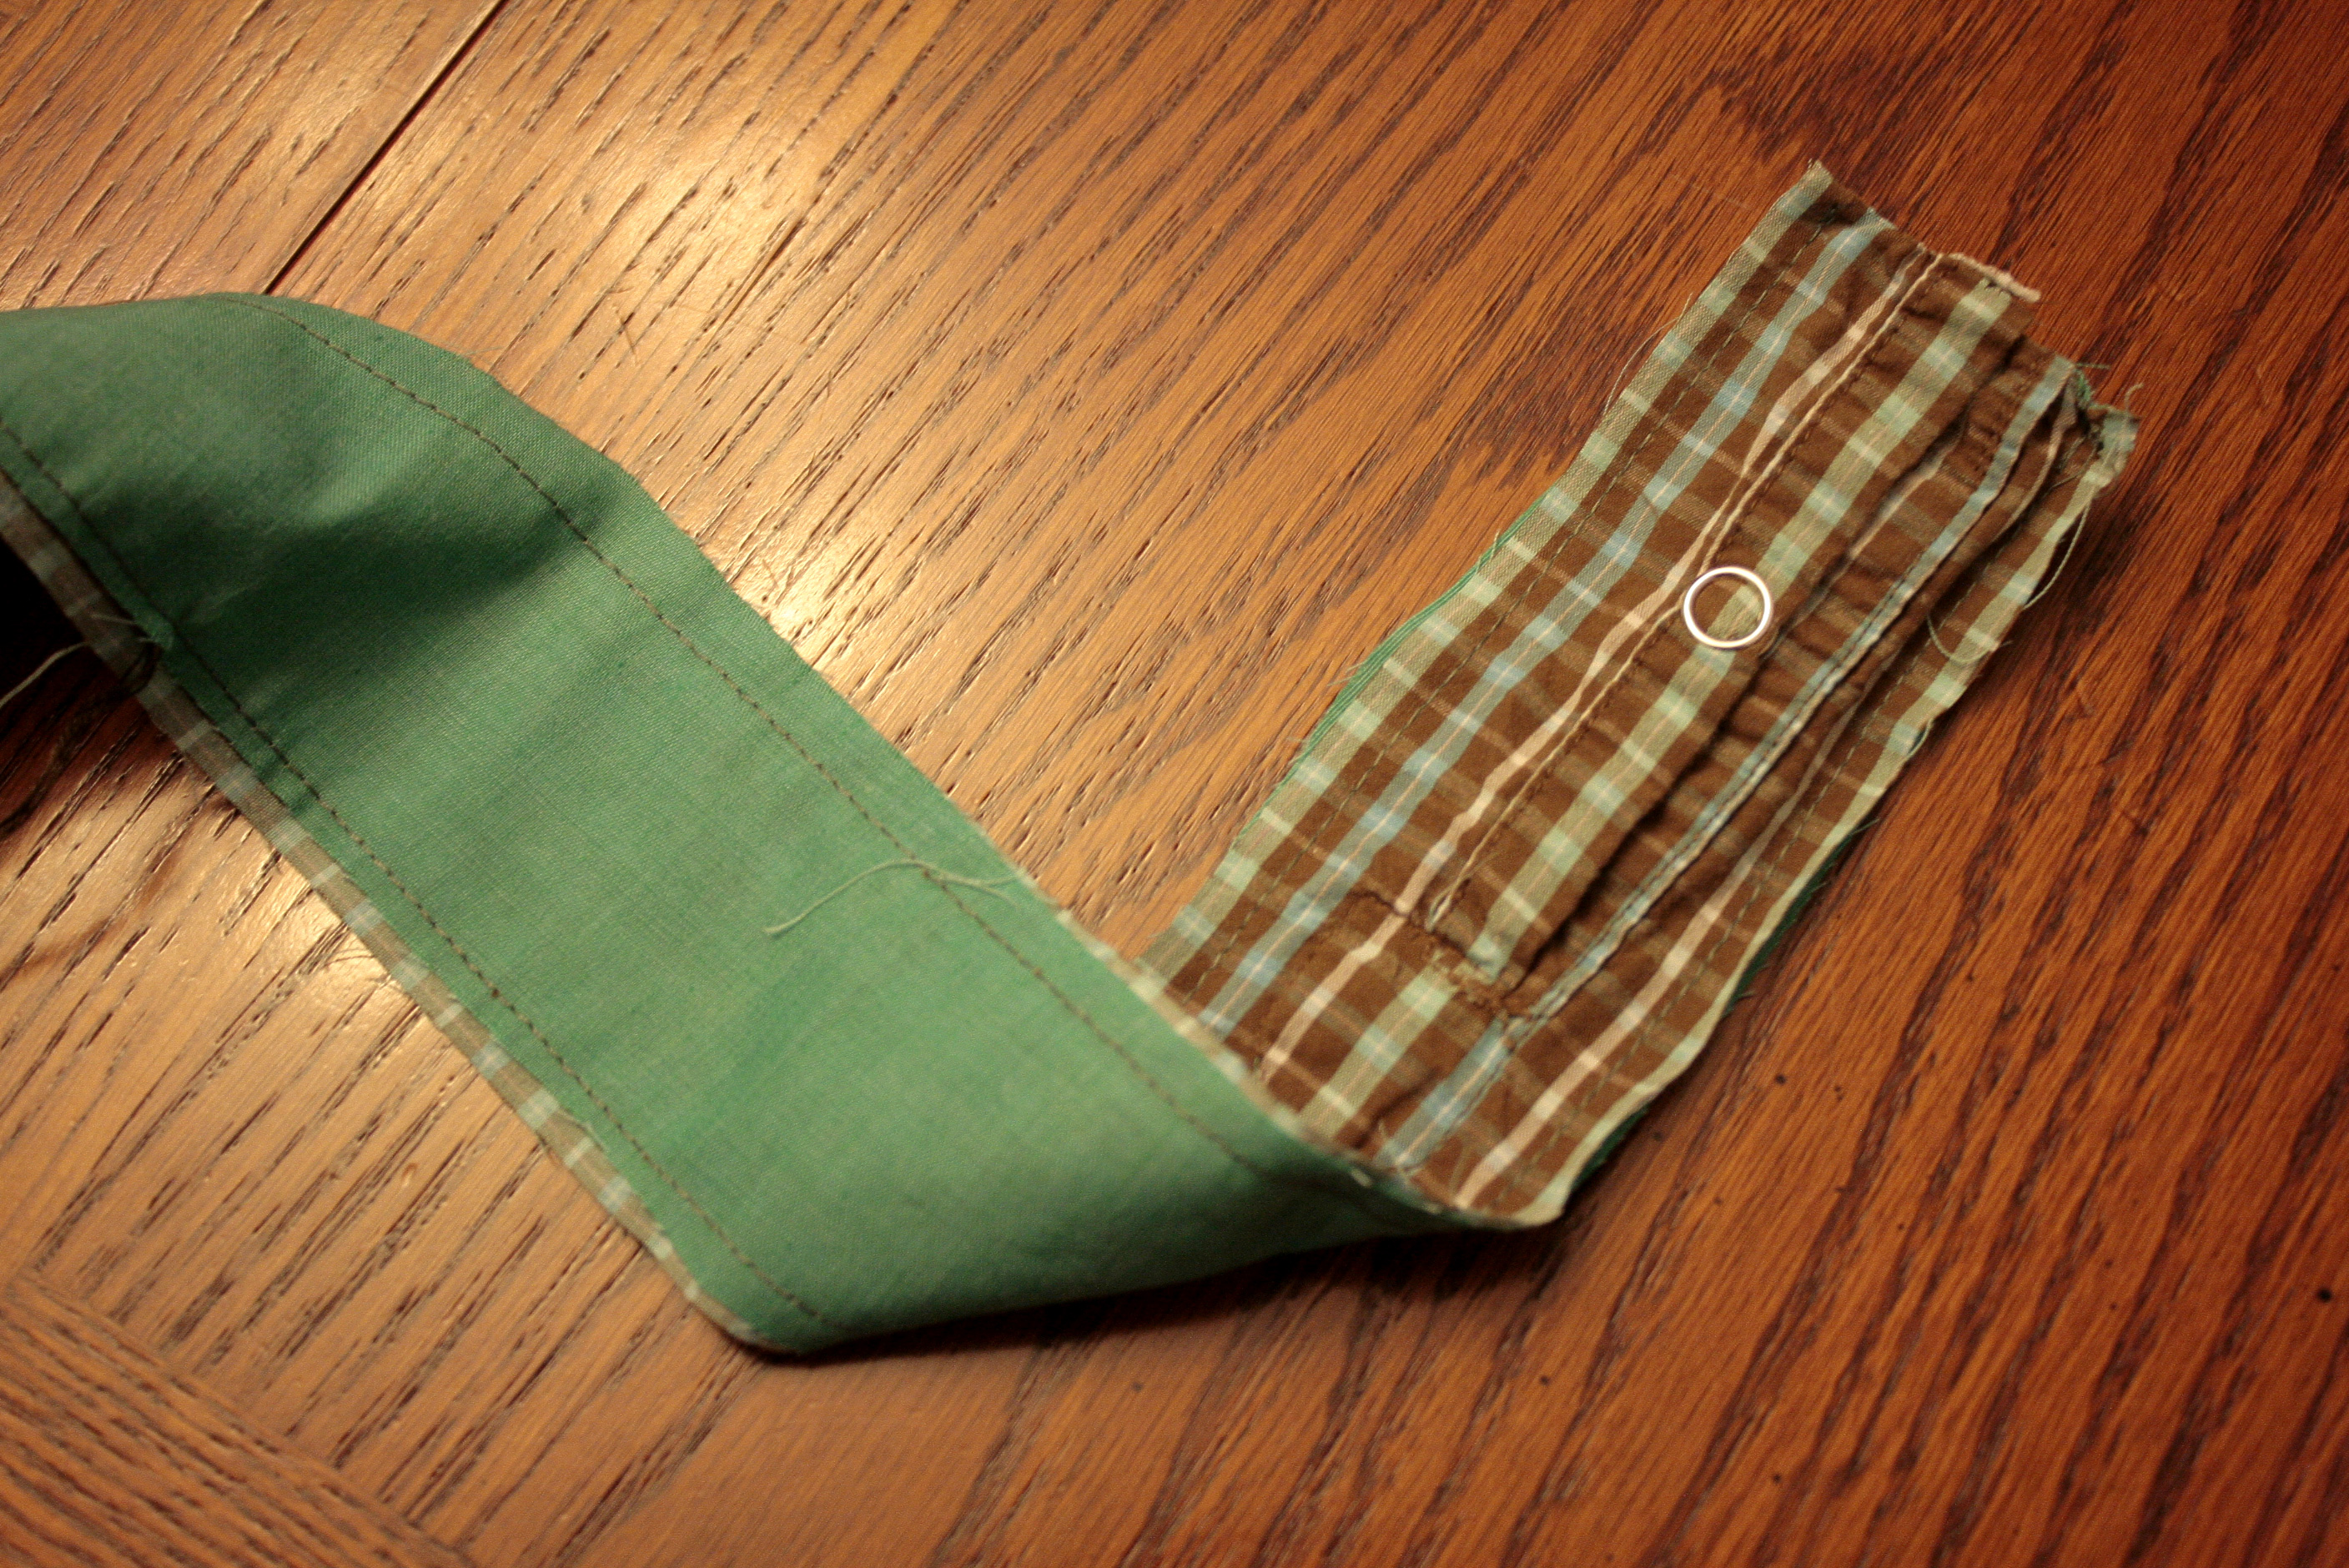
Now get the strap ready. First sew the strips together at the centers so you have a single long strip from the shirt fabric and from the liner fabric. Then sew them together with right sides together (shown below). Turn right side out. Hem the bottoms or fold under. Then sew the strap to the bag with an X inside a square.

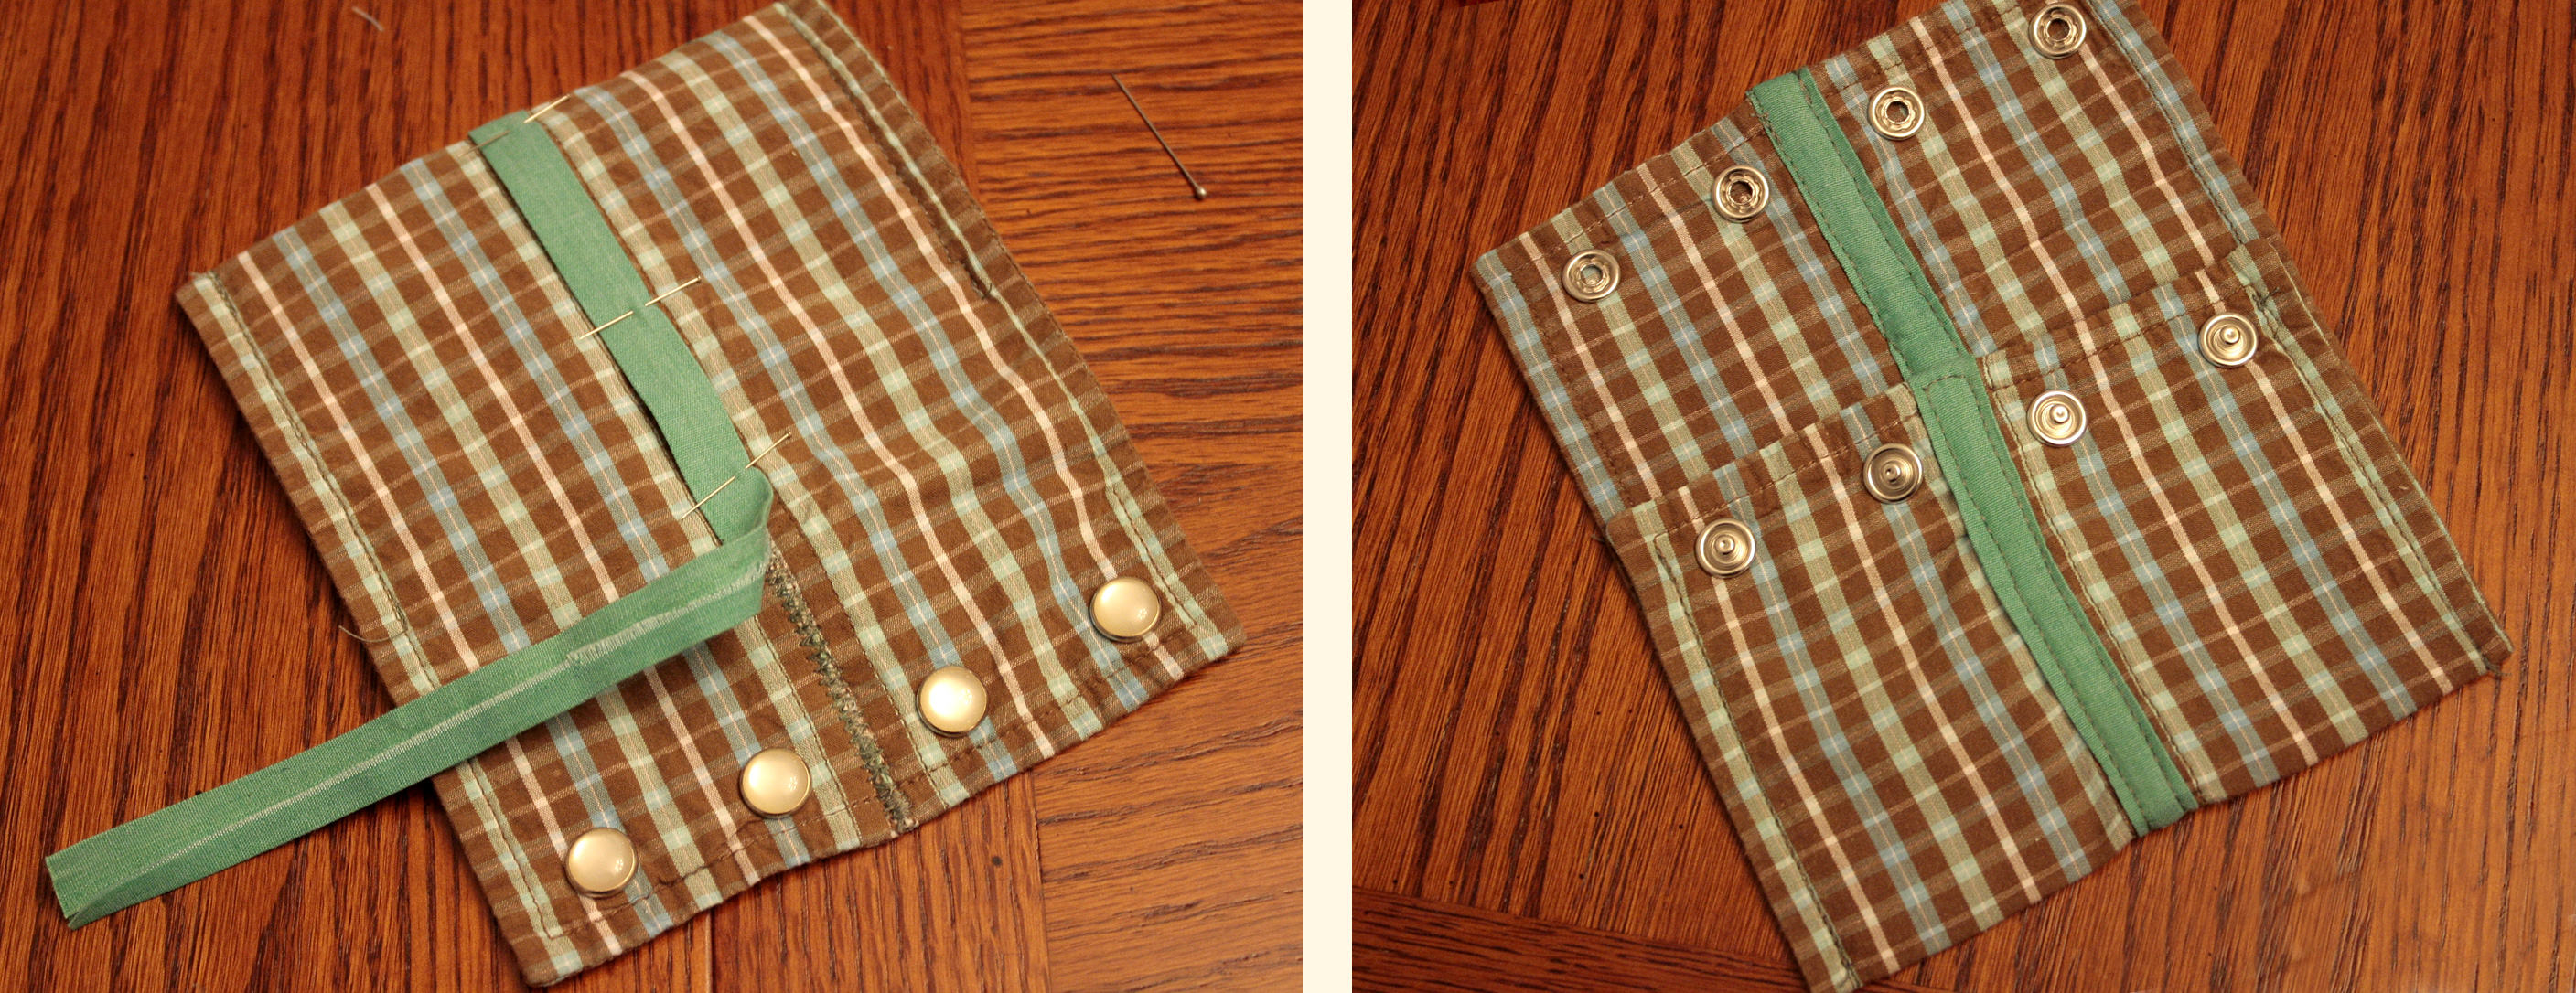
For the wallet you'll cut off both cuffs from the shirt and open them up. Line up the raw edges of the two cuffs and zig zag stitch them together. Cut a 1" strip of fabric for the contrasting stripe and iron the long edges under 1/4". Sew it to the center to cover up the zig zag stitching/raw edges of the cuffs. Then fold up about 2/3 of the bottom of the wallet and stitch down the sides. The snaps from the shirt act as the closure.


And here's a few more shots of the finished set!


* This is a free pattern designed only to give you a guideline as to how I made this upcycled purse. All shirts are different so there are no guarantees yours will turn out exactly like this one. Please use the pattern at your own risk. 

Friday, May 27, 2011

SMS Giveaway Day Winner!

Congratulations to Franstuff, comment #247! Out of 250 comments you were the lucky winner of the tote bag and fat quarters! I've sent you an e-mail with more information about your win.

I also wanted to welcome the new followers to the blog. Thanks for visiting my site and participating in the giveaway! It was so fun for me to read all of your comments and see what everyone was working on. This is a busy group of sewers and crafters!

Just to introduce you to Bugglebee, I usually post one tutorial a week and I'll include free printables or patterns for projects that require them. I just started this blog earlier this year but below are some examples of what you might find here (or just click on the tutorials button above for the full list). Thanks again for visiting and for being a part of this blog!


Sunday, May 22, 2011

Time for a giveaway!

*** This giveaway is now closed. Thanks to all who entered!***

Sew Mama Sew is hosting their twice a year giveaway day when tons of crafting/sewing blogs all host giveaways at the same time. It's a great way to find new blogs (and hopefully win some things too)!


I'm giving away a tote bag and a bundle of four fat quarters! Except for the red and white polka dots, all the fabrics are from Denyse Schmidt's new line of fabric. The tote is a little smaller than a grocery bag. It's lined with red polka dot fabric and features contrast red stitching, reinforced straps, and a small interior pocket.


To enter: Just leave me a comment!
  • If you need a suggestion, you can tell me what you're currently working on.
  • You must be a follower through Google Friend Connect, RSS, or e-mail.
  • The giveaway is open to U.S. and Canada residents only.

Make sure your e-mail is linked in your profile so I have a way to contact you! If you want to be sure, leave it in this format myname(at)place(dot)com so you don't get lots of spam.

The giveaway will remain open until Friday, May 27 at 8:00 PM EST. The winner will be chosen through random.org and contacted by e-mail. And if you're interested in more giveaways, check out my other blog Craft Buds where we're giving away everything in the photo below!


Thursday, May 19, 2011

Giveaway News

Hello followers and visitors! Sorry for the lack of posts for the last couple weeks. Other things are keeping me busy so in place of tutorials (which I'll be posting again soon), here's some other exciting news!

Sew Mama Sew Giveaway Day
Sew Mama Sew is hosting their twice a year Giveaway Day May 23-25. It's huge. Over 300 blogs particpate in handmade giveaways and you still have time to add your blog if you want to join in. Bugglebee will be giving away something too so come back on the 23rd to find out what it is! 

You can also check out my other blog, Craft Buds, for tips on hosting and promoting your giveaways. We'll be hosting a giveaway there too. Lindsay who I run Craft Buds with will have another giveaway on her personal blog, Lindsay Sews.


Friends' Adoption and iPad Giveaway
Second item in giveaway news has to do with my friends Alex and Ray. I grew up with Alex and have known her all my life and I met Ray in high school through our church's youth group. They are an awesome couple with 3 great biological kids. They've decided to add to their family by adopting twins from Eastern Europe, Max and Lena.


They will to travel to Europe at the end of this month. While they prepare you can help out a great cause by donating to their adoption fund. Every $5 you donate counts as an entry toward an iPad giveaway they are hosting. You can find out more about their giveaway and their adoption process at their adoption blog. Make sure to enter by May 21 for the iPad! After that date you can still make a donation, it just won't go toward the giveaway.

Friday, April 29, 2011

All-In-One Picnic Blanket Tote

With summer just around the corner I'm getting ready to enjoy to family picnics and being outside again (finally!). I wanted to make a picnic blanket that was waterproof on one side and easy to store so I came up with this design. This would also be great for the beach and keeping the sand out of your blanket! It features a shower curtain or vinyl table cloth on the bottom, a blanket on the top, an attached pocket that the whole blanket folds up into and an easy to carry shoulder strap.

Materials:
  • 1 heavy duty vinyl shower curtain with magnets, patterned or clear--mine was 71" x 70" (if you get the type with suction cups on the sides they'll show up in the final blanket). I also tried this with a vinyl table cloth which looked really cute but was not as durable.
  • 1 twin XL blanket, washed and dried--the one I used was 92" x 63"
  • 45" shoulder strap (or whatever length feels comfortable for you)
  • sewing machine and lots and lots of pins
1. Cut off the bottom of the blanket so it is now 73" x 63". You'll now have a scrap piece that's 19" x 63". If you're not using a twin XL blanket you're going to start with a basic rectangle of 71" x 60". Add 2" to each side that will you cut with a raw edge and 1" to each side that you cut with a finished edge because the finished edges you only fold over once in step 3 and the raw edges you fold twice.

2. Trim off the top of the shower curtain and the bottom with the magnets so it's 60" tall (and still the original 71" wide). I took photos but with this being so large a project I decided that drawn diagrams would be more helpful!

3. Make the pillow piece: Cut a piece 18" wide x 16" tall from the scrap blanket fabric to use for the pillow. One of the 16" sides should be the finished blanket edge (which will be the top of the pillow opening). Hem the 3 raw edges of the pillow by folding the edges over twice, 1/2" each fold. The pillow piece should now be 16" wide x 15" tall. Then fold under the ends of the strap to prevent fraying and sew the strap onto the sides of the fabric.


4. Position the pillow in one of the corners of the blanket that has finished edges. Place it 1" away from the edges and sew around the sides and bottom.

5. Now you have a blanket with a pillow pocket that is 73" x 63" and a shower curtain that is 71" x 60". Center the shower curtain 1" away from the finished top and sides of the blanket and there will be an extra 1" along the raw edge. Fold the extra 1" inch of blanket over the shower curtain and pin down. At the raw edge, fold over twice and pin down.

6. Sew around the entire blanket using a larger stitch to avoid putting too many holes into the vinyl.

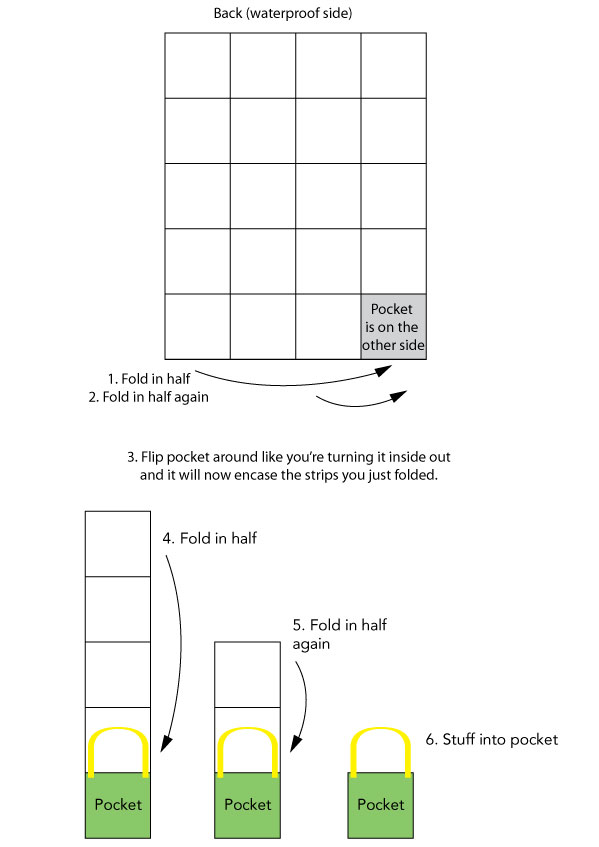
7. Fold your blanket up into the pocket and you're ready to impress everyone at the park! To fold the blanket, lay it flat with the vinyl side up then fold it in half lengthwise, then in half again. Turn the pocket inside out so the strips you just folded are now inside the pocket. Fold the strip above the pocket in half, then in half again, then stuff it in the pocket. Now your blanket is easy to store and carry and even doubles as a pillow!

And here's how the folding technique looks in real life:


Additional notes:
  • When the blanket is open you can hide the strap inside the pocket. The pocket can also double as storage and makes a great spot to stash napkins, disposable plates, and other items that blow away at a picnic.
  • If you're not going to be outside on wet ground this would be even easier without the waterproof layer.
  • An all fleece version of this would be fun for kids for road trips, a fun and functional pillow to have on the couch, or great for sports fans. It would double as either a seat cushion or a blanket!
  • The fluffier the blanket the harder it is to stuff it into the pocket so thinner or single layer blankets work best.
  • The blanket would be easier to fold if you stitched along the fold lines. I was hesitant to try this with the vinyl backing because all the holes would make it less durable. But it could be a good addition to a non-waterpoof version.
  • Rather than folding the blanket edge over the vinyl side you can also use bias tape. Or you can remove the binding from your blanket then stitch it back on once the vinyl is pinned down. It looks nice but it's a lot of extra work and maybe not worth it, trust me.

One Month to Win It: I Won!!

Thanks to everyone for your kind words, support and voting over the last month of the One Month to Win It contest! The final results just posted and I was the winner of Season 2! There was a great group of ladies competing and so much talent and great ideas. I really enjoyed seeing what everyone came up with for the different themes.

My final project for the "refashion" theme was turning a shirt into a purse. Tutorials for both this week's shirt to purse and last week's all-in-one picnic blanket tote will be posting soon! The blanket should be ready to post later today and the purse will be ready for next week. Below ou can see my contest entries from each week:

 Week 4 (Finals), Refashion: Shirt to Purse

  
Week 3, Outdoor craft: All-in-one Picnic Blanket Tote