click map Home Tutorials About FAQ
Showing posts with label tutorial. Show all posts

Tuesday, May 31, 2011

Upcycle: Shirt to Purse


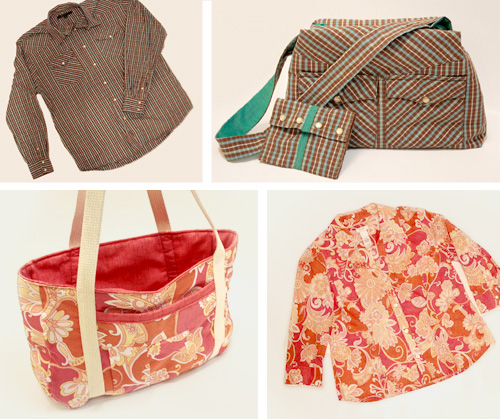
Some of you may recognize the top shirt/purse as my final project from One Month to Win It, a sewing/crafting contest that I won in April! I love the little details in clothing so I used those details in my purse patterns. You can find the pattern for the pink shirt/tote over at Craft Buds. I've uploaded a free PDF pattern* for this purse here. The pattern is 2 pages. You'll want to print both pages out, line up the dots and tape them together. For some reason, in my browser the PDF preview shows the pages are cropped but once I download it, it shows correctly.

For this bag you'll need:
  • one long-sleeved western style shirt
  • 1/2 yard fusible fleece
  • 1/2 yard fabric for the liner (I used a heavier weight home dec fabric)
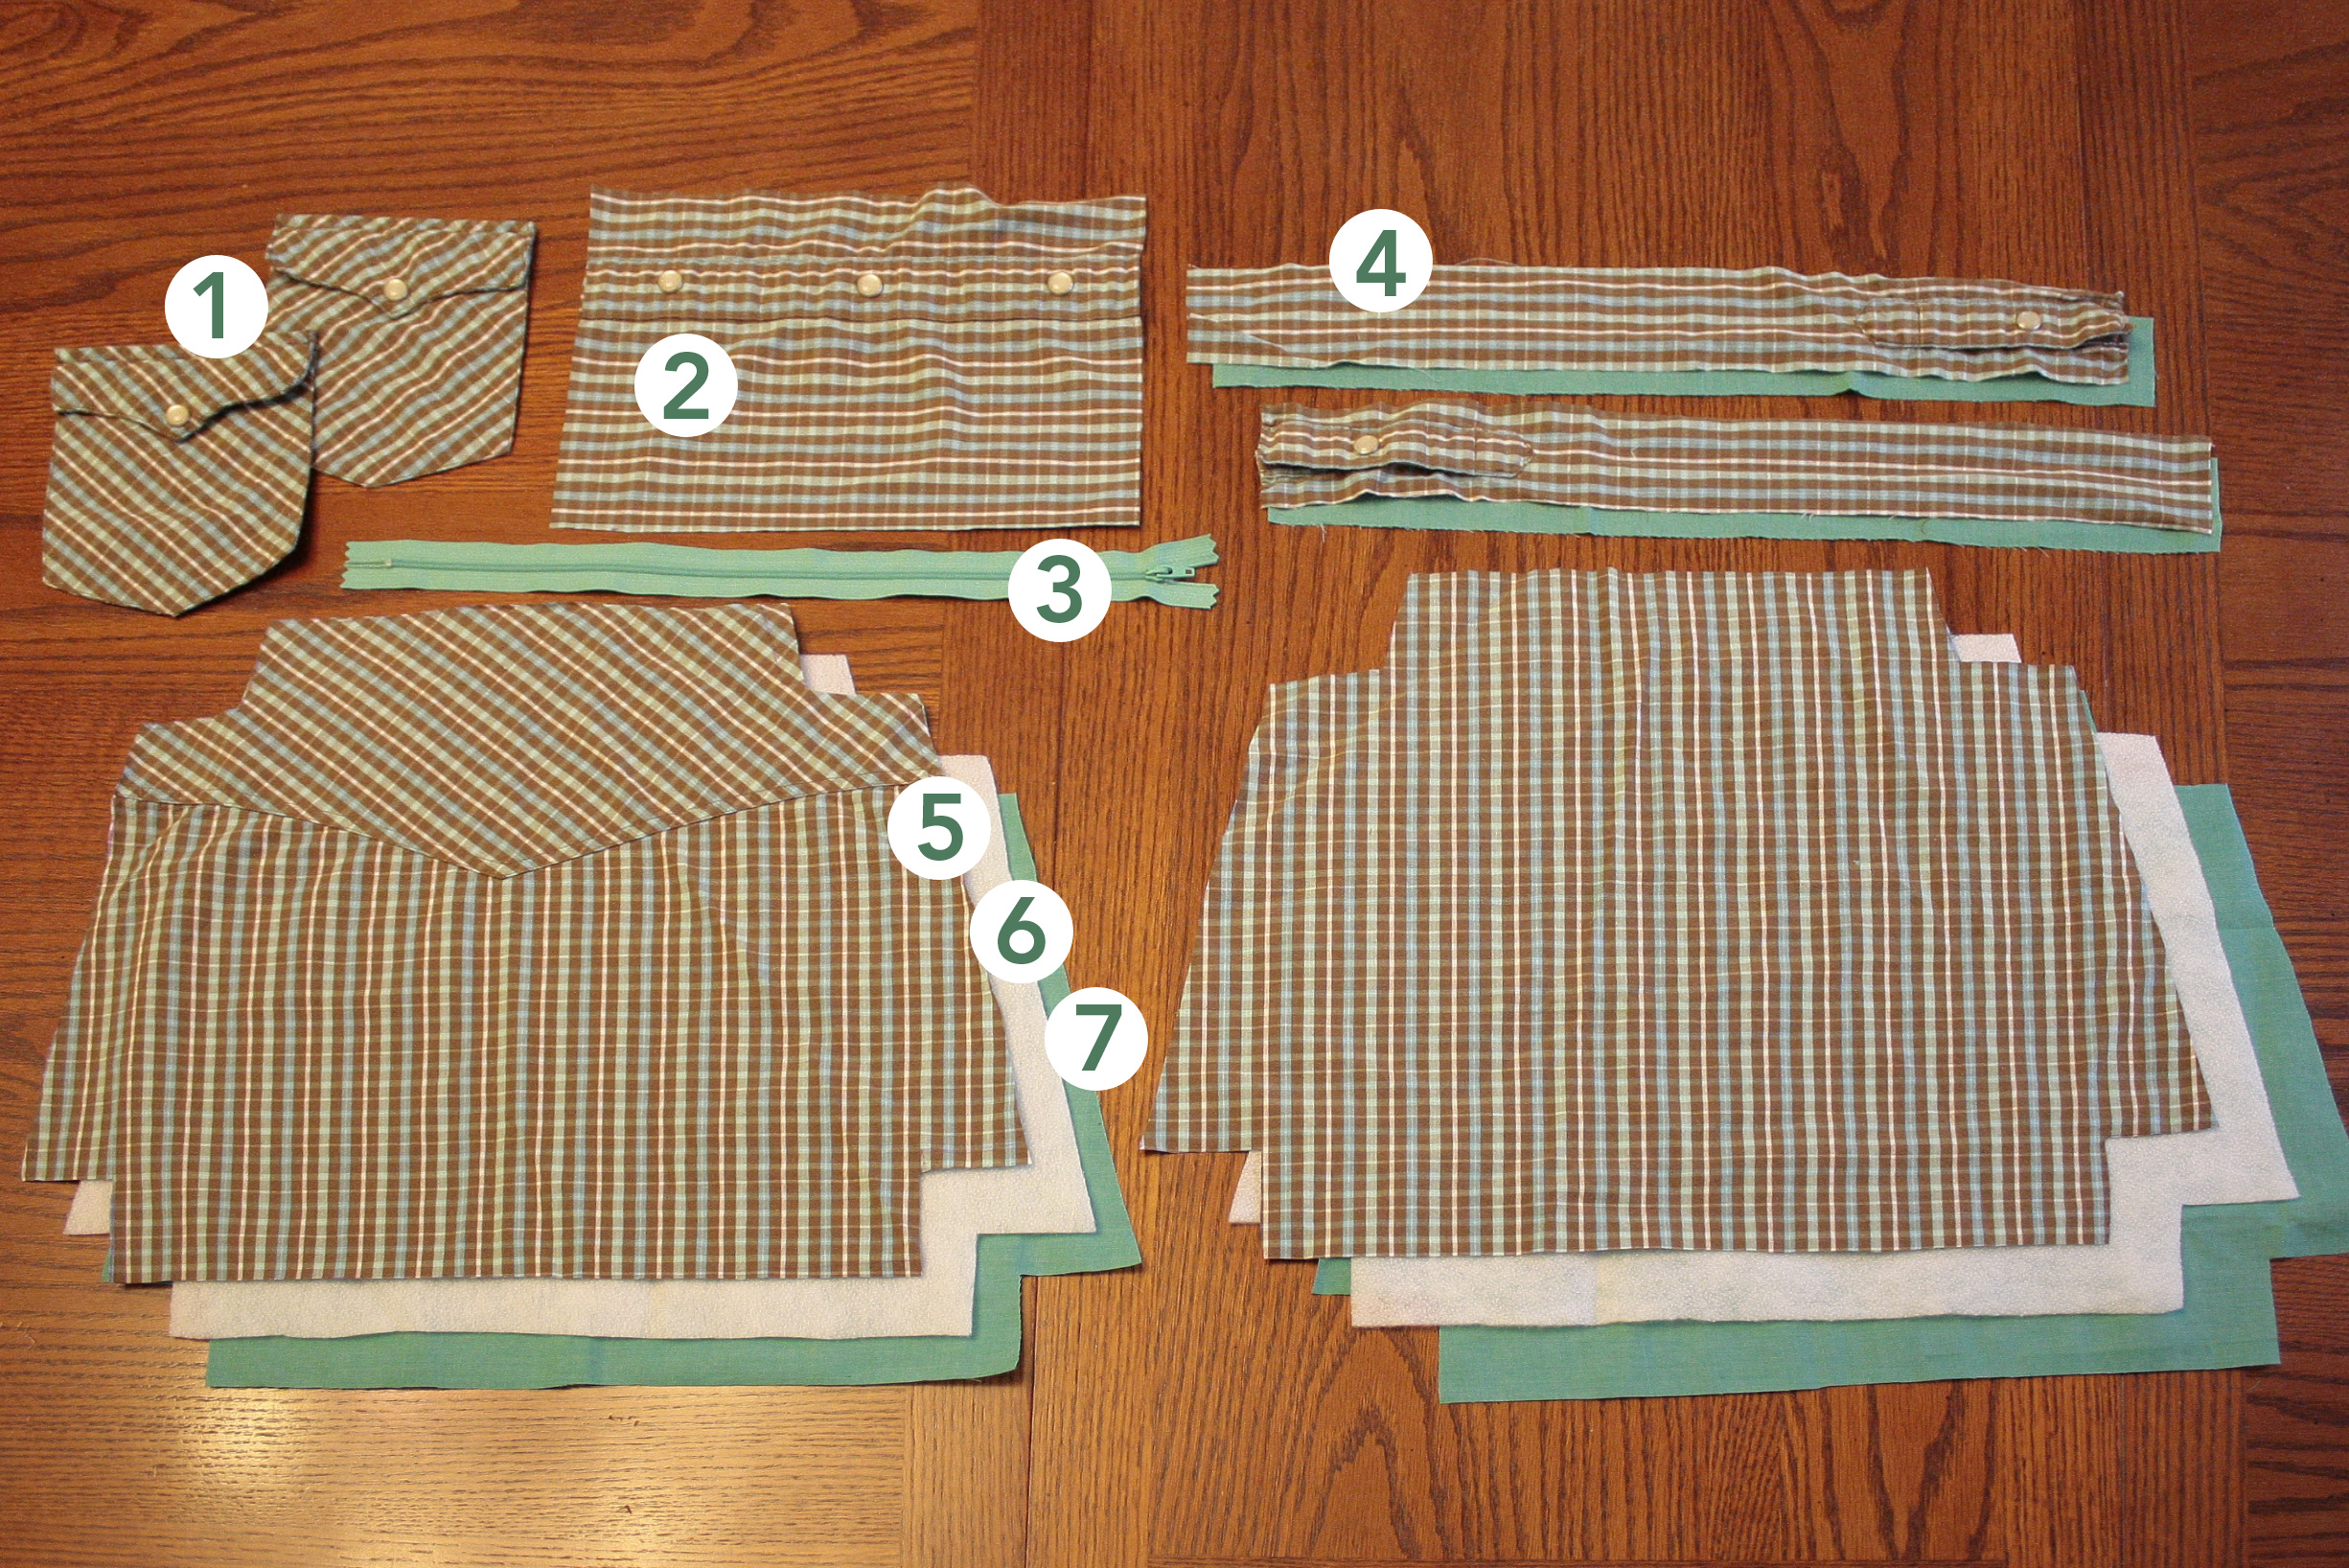
To get started, assemble all the pieces in the photo below including:
  1. Two pockets from the front of the shirt
  2. A 6 1/2" x 9 1/2" rectangle for the inner fabric including the buttons from the front of the shirt
  3. 12" (or longer) zipper
  4. Four strips total of 18" x 2 1/2" fabric, one strip cut from each of the two shirt sleeves including the button, and two strips from the liner fabric. (Using these measurements, the final sewn and attached strap will be around 34" long x 2" wide so feel free to adjust as necessary if you'd like a different length/width. If you're using a lighter weight fabric shirt and/or liner, you may want to add strips of the fusible fleece to the inside of the strap for extra reinforcement.)
  5. Use the pattern to cut pieces from the top back and lower back of the shirt for the main body of the bag.
  6. Use the pattern to cut two pieces of fusible fleece.
  7. Use the pattern to cut two pieces of the liner fabric.
  8. Save the cuffs for a wallet (pictured near the end of the post).
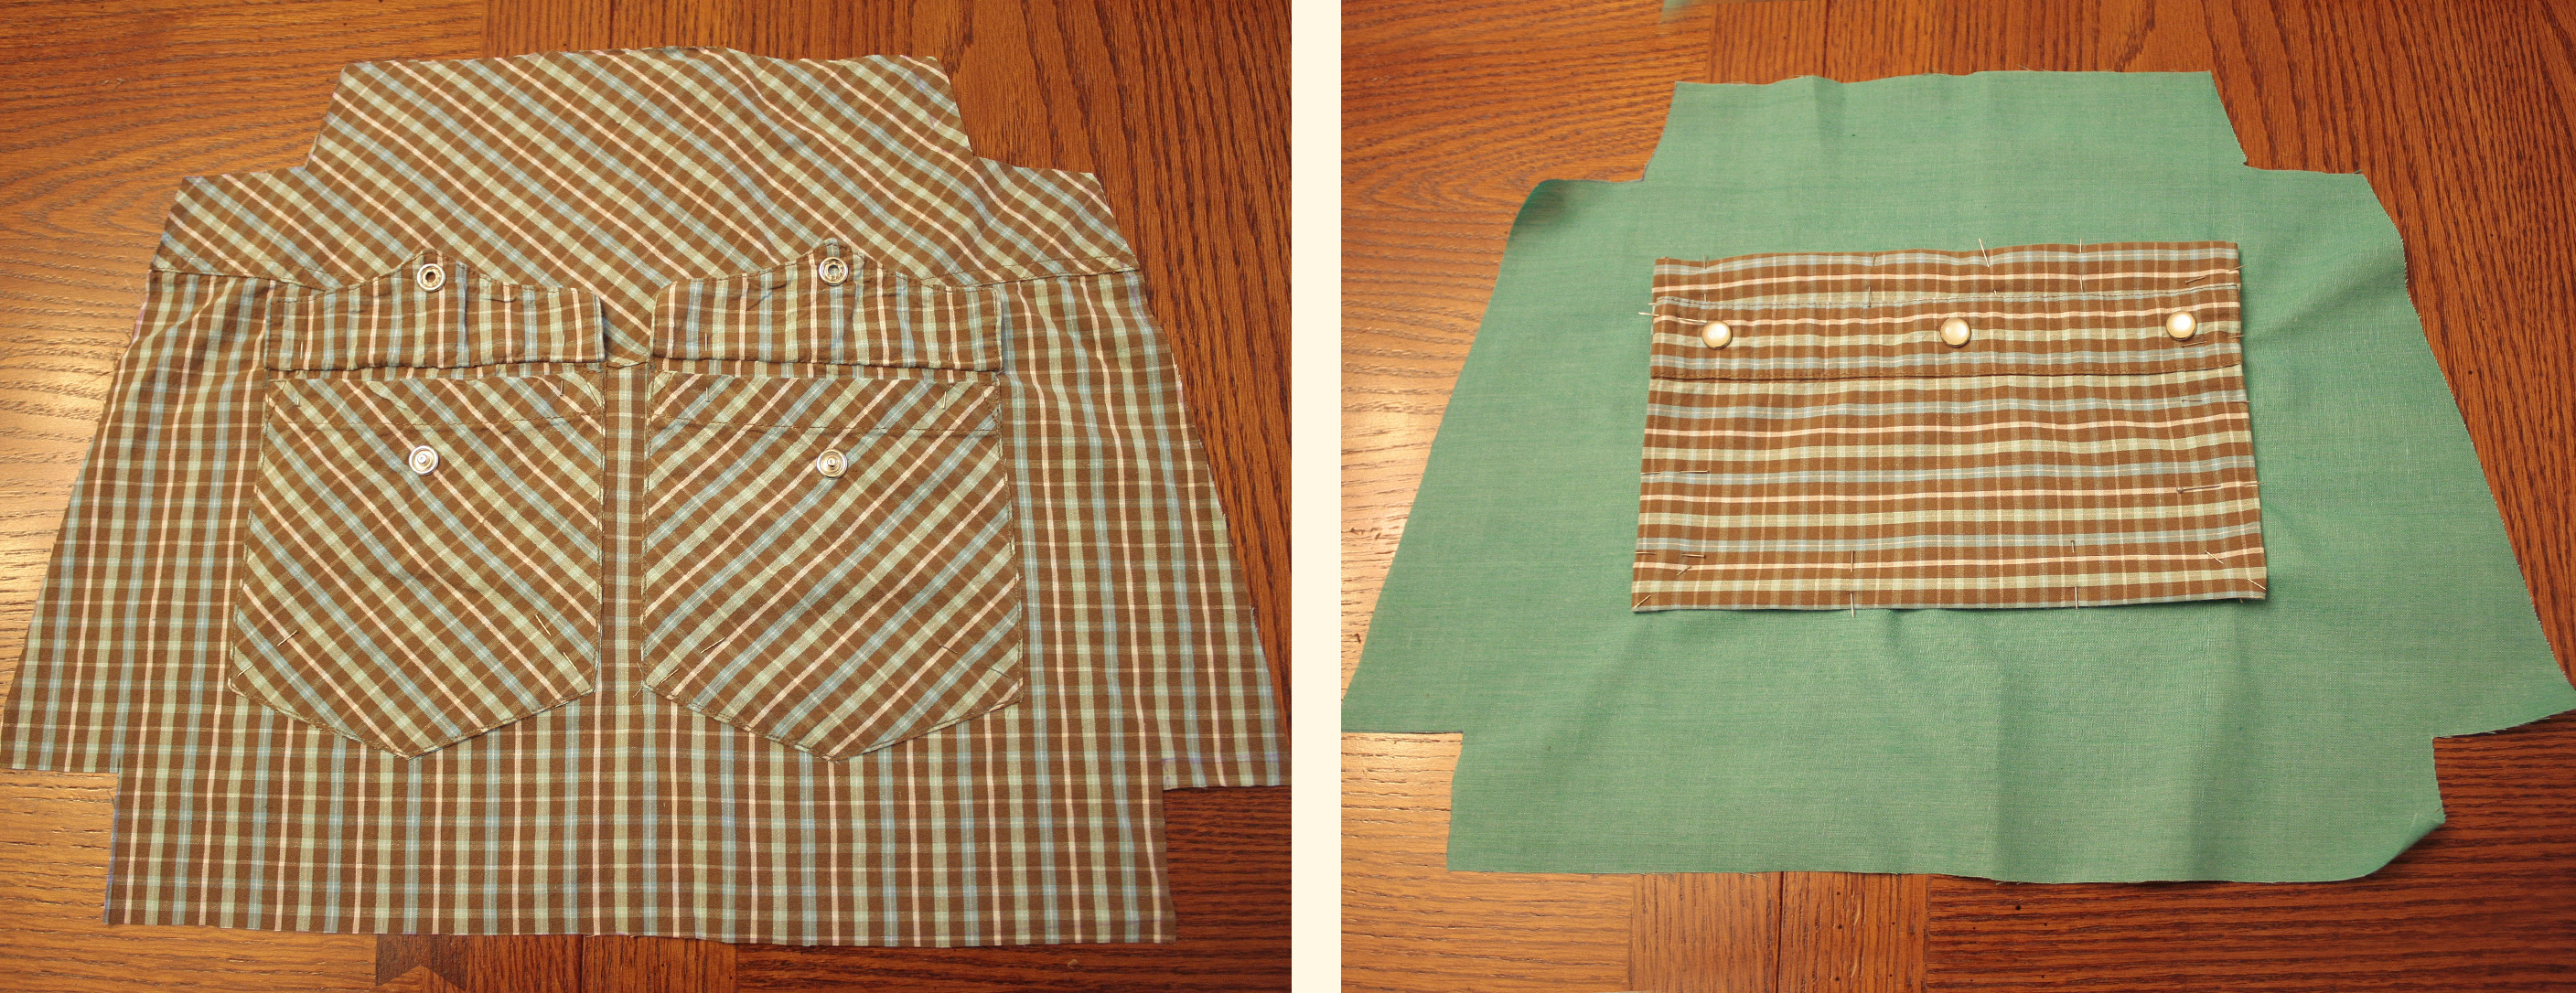
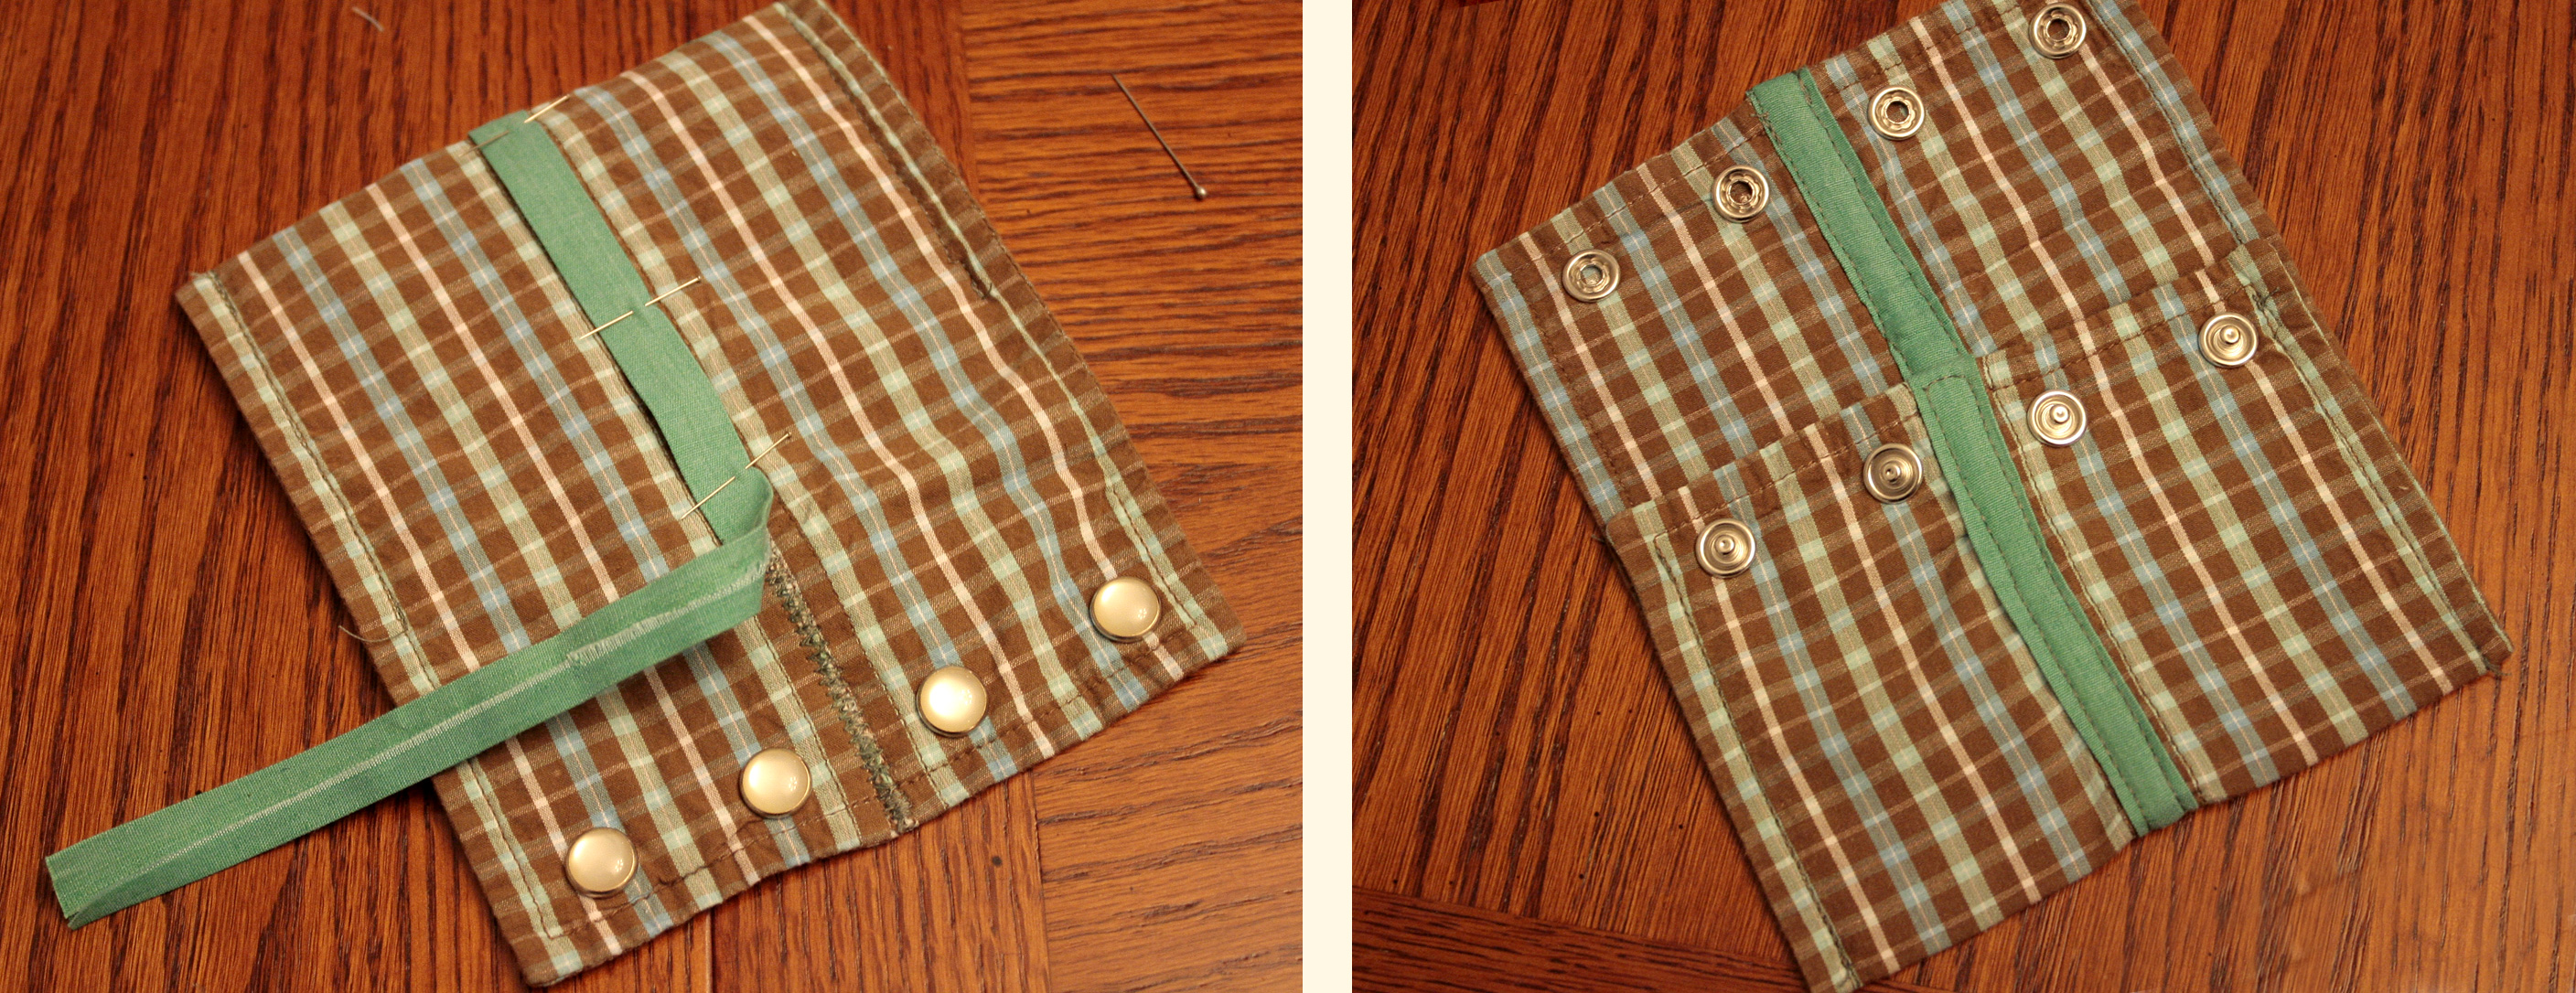
First you'll get the pockets ready. Sew the pockets to one of the exterior pieces (left photo). I sewed across the top, then pinned the flaps up and sewed the sides and bottom. For the inner pocket (right photo), hem the edges of the rectangle and sew it to one of the pieces of fabric for the liner.


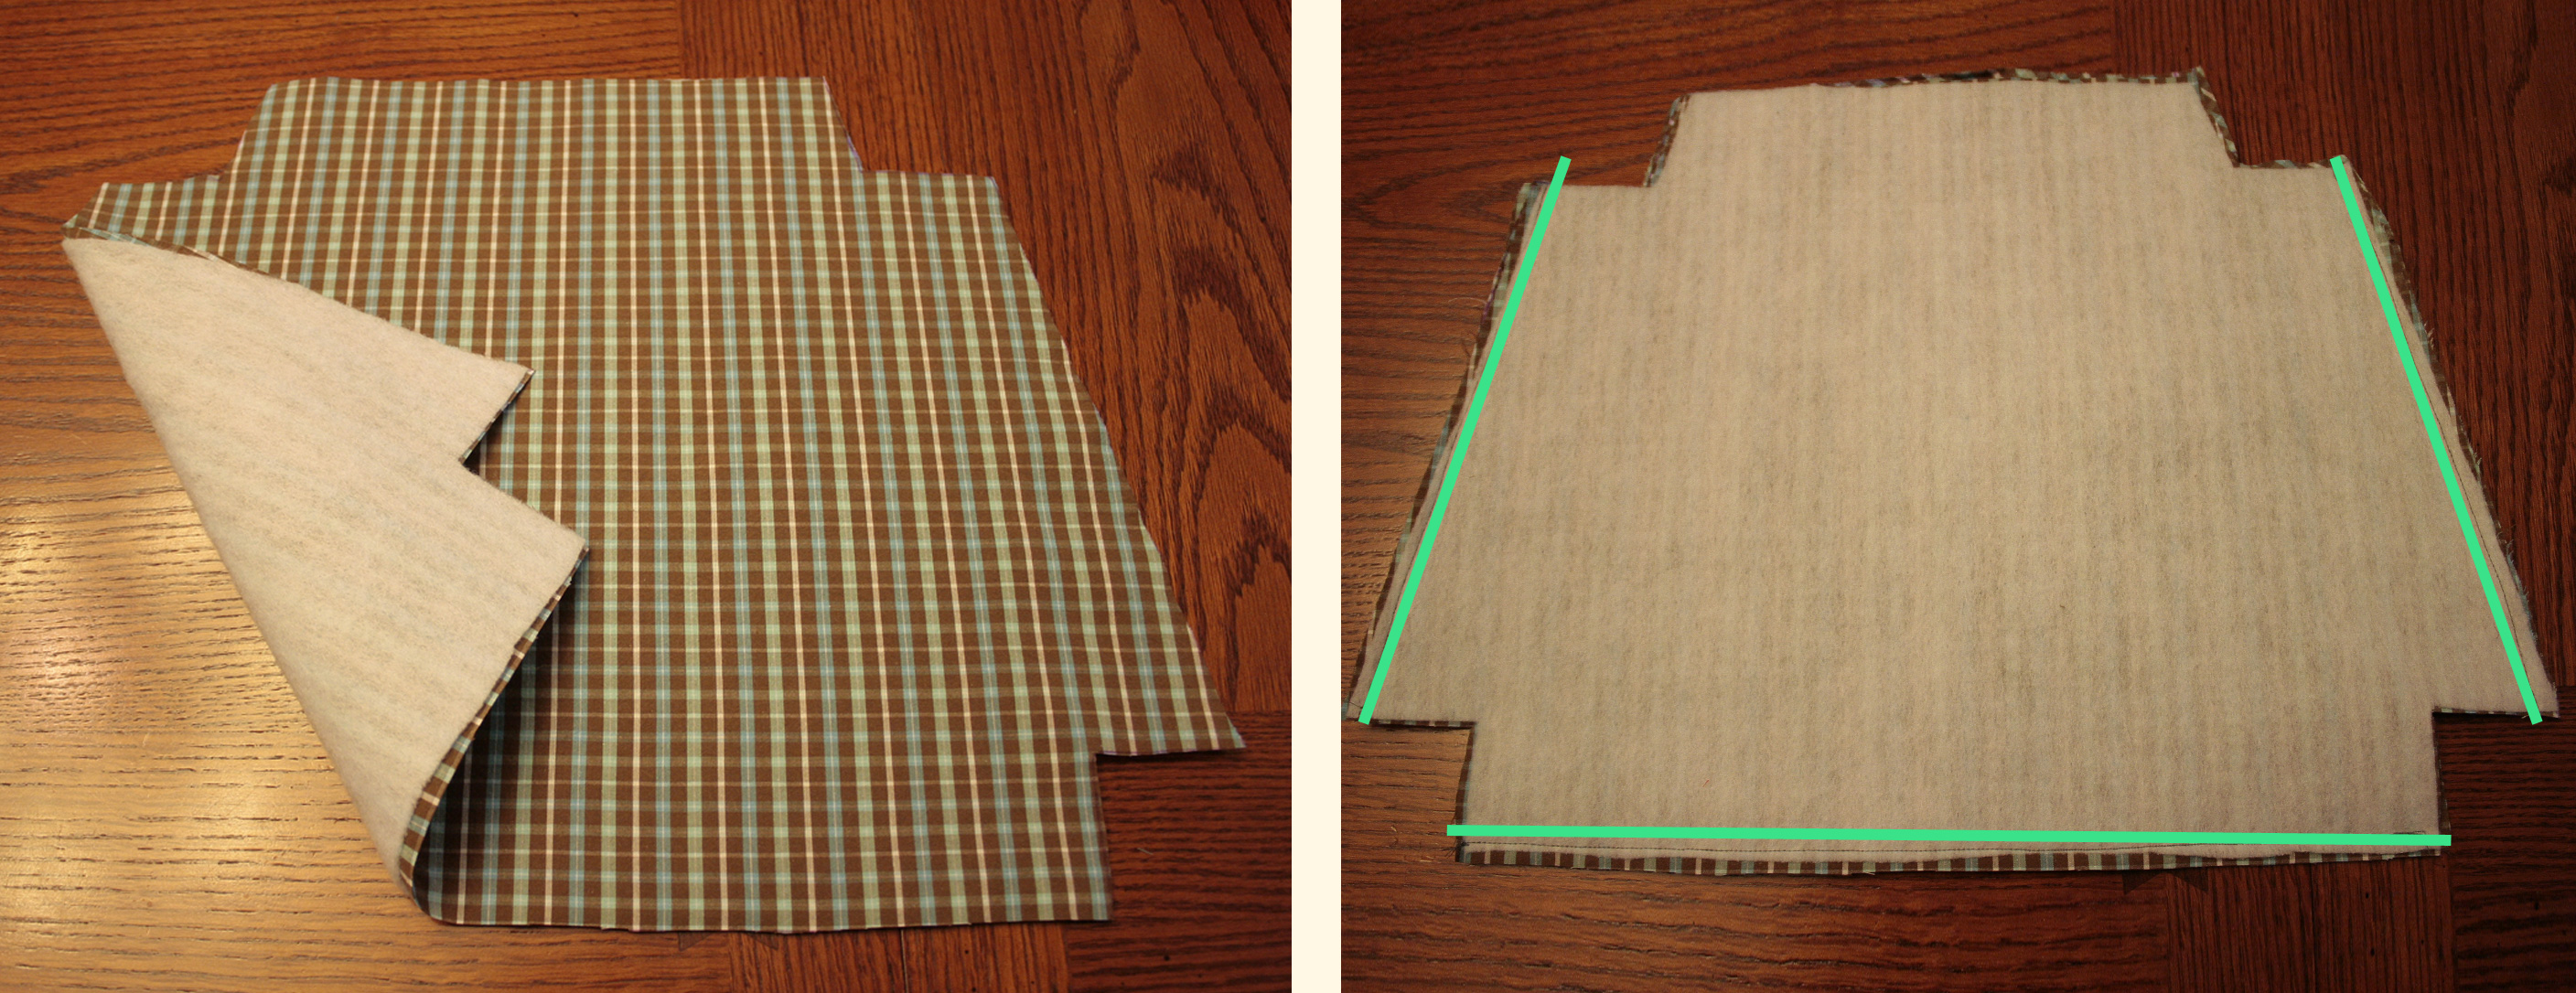
Iron the fusible fleece to the shirt fabric. Iron the top of the piece down 3/8" to help later with the zipper installation. It's optional if you want to stitch it down.

Then with right sides together sew the bottom and sides shut.

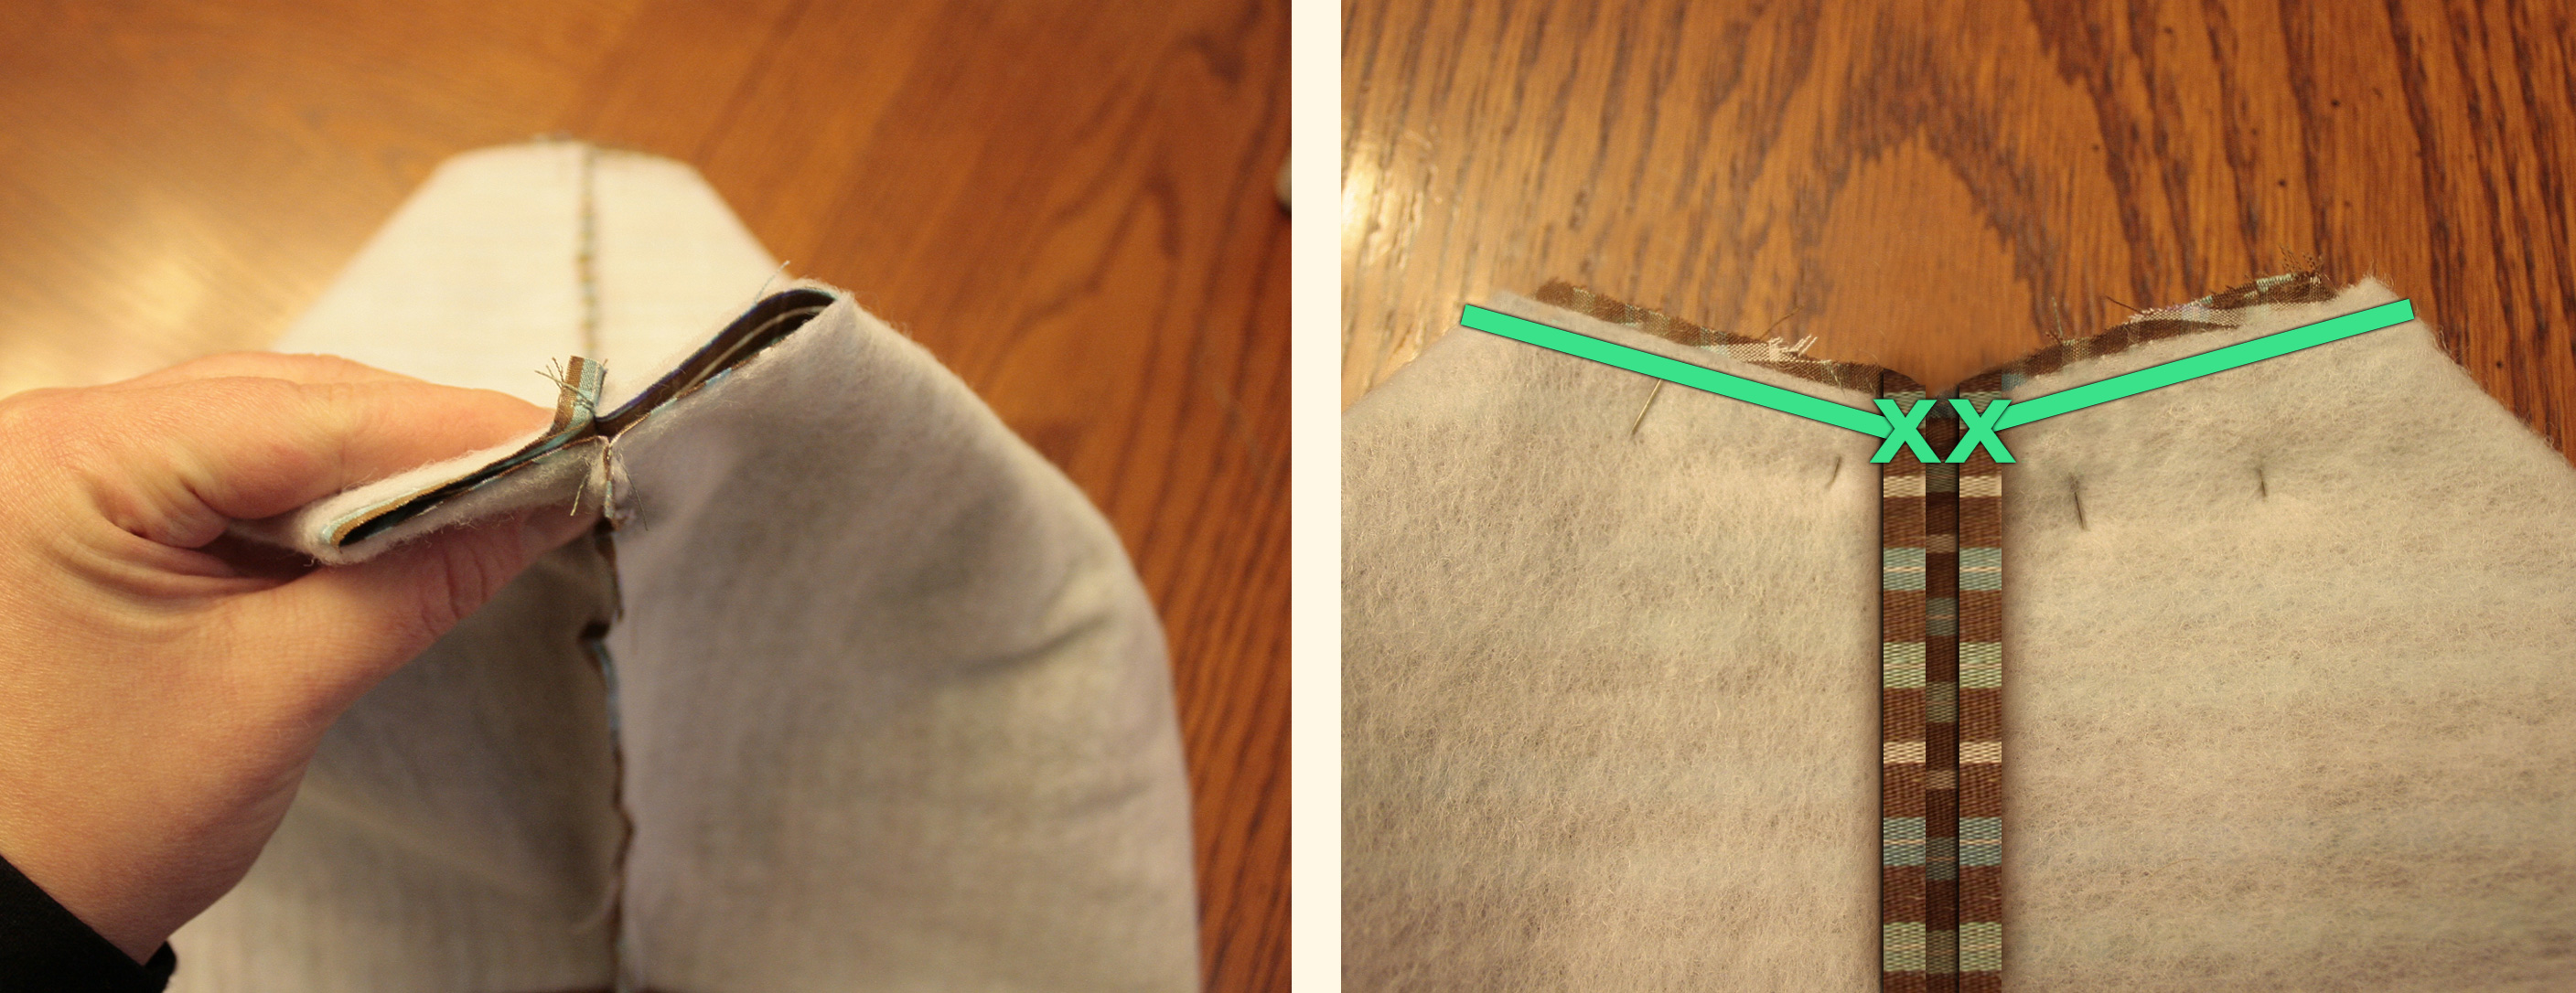
Then pinch together the bottom corners (left photo below) and sew them shut. Pinch together the top corners (right photo below) and sew together, sewing down your folded or hemmed edges from the step above and leaving a 1/4" gap where you'll be adding the zipper soon.


Follow the same instructions for the liner. Then nestle the liner inside the outer pieces. Now pin the zipper in place between the two layers and stitch along the sides using your zipper foot. (The left photo below shows raw edges, but in your version you should have either ironed or stitched the raw edge two steps ago.)


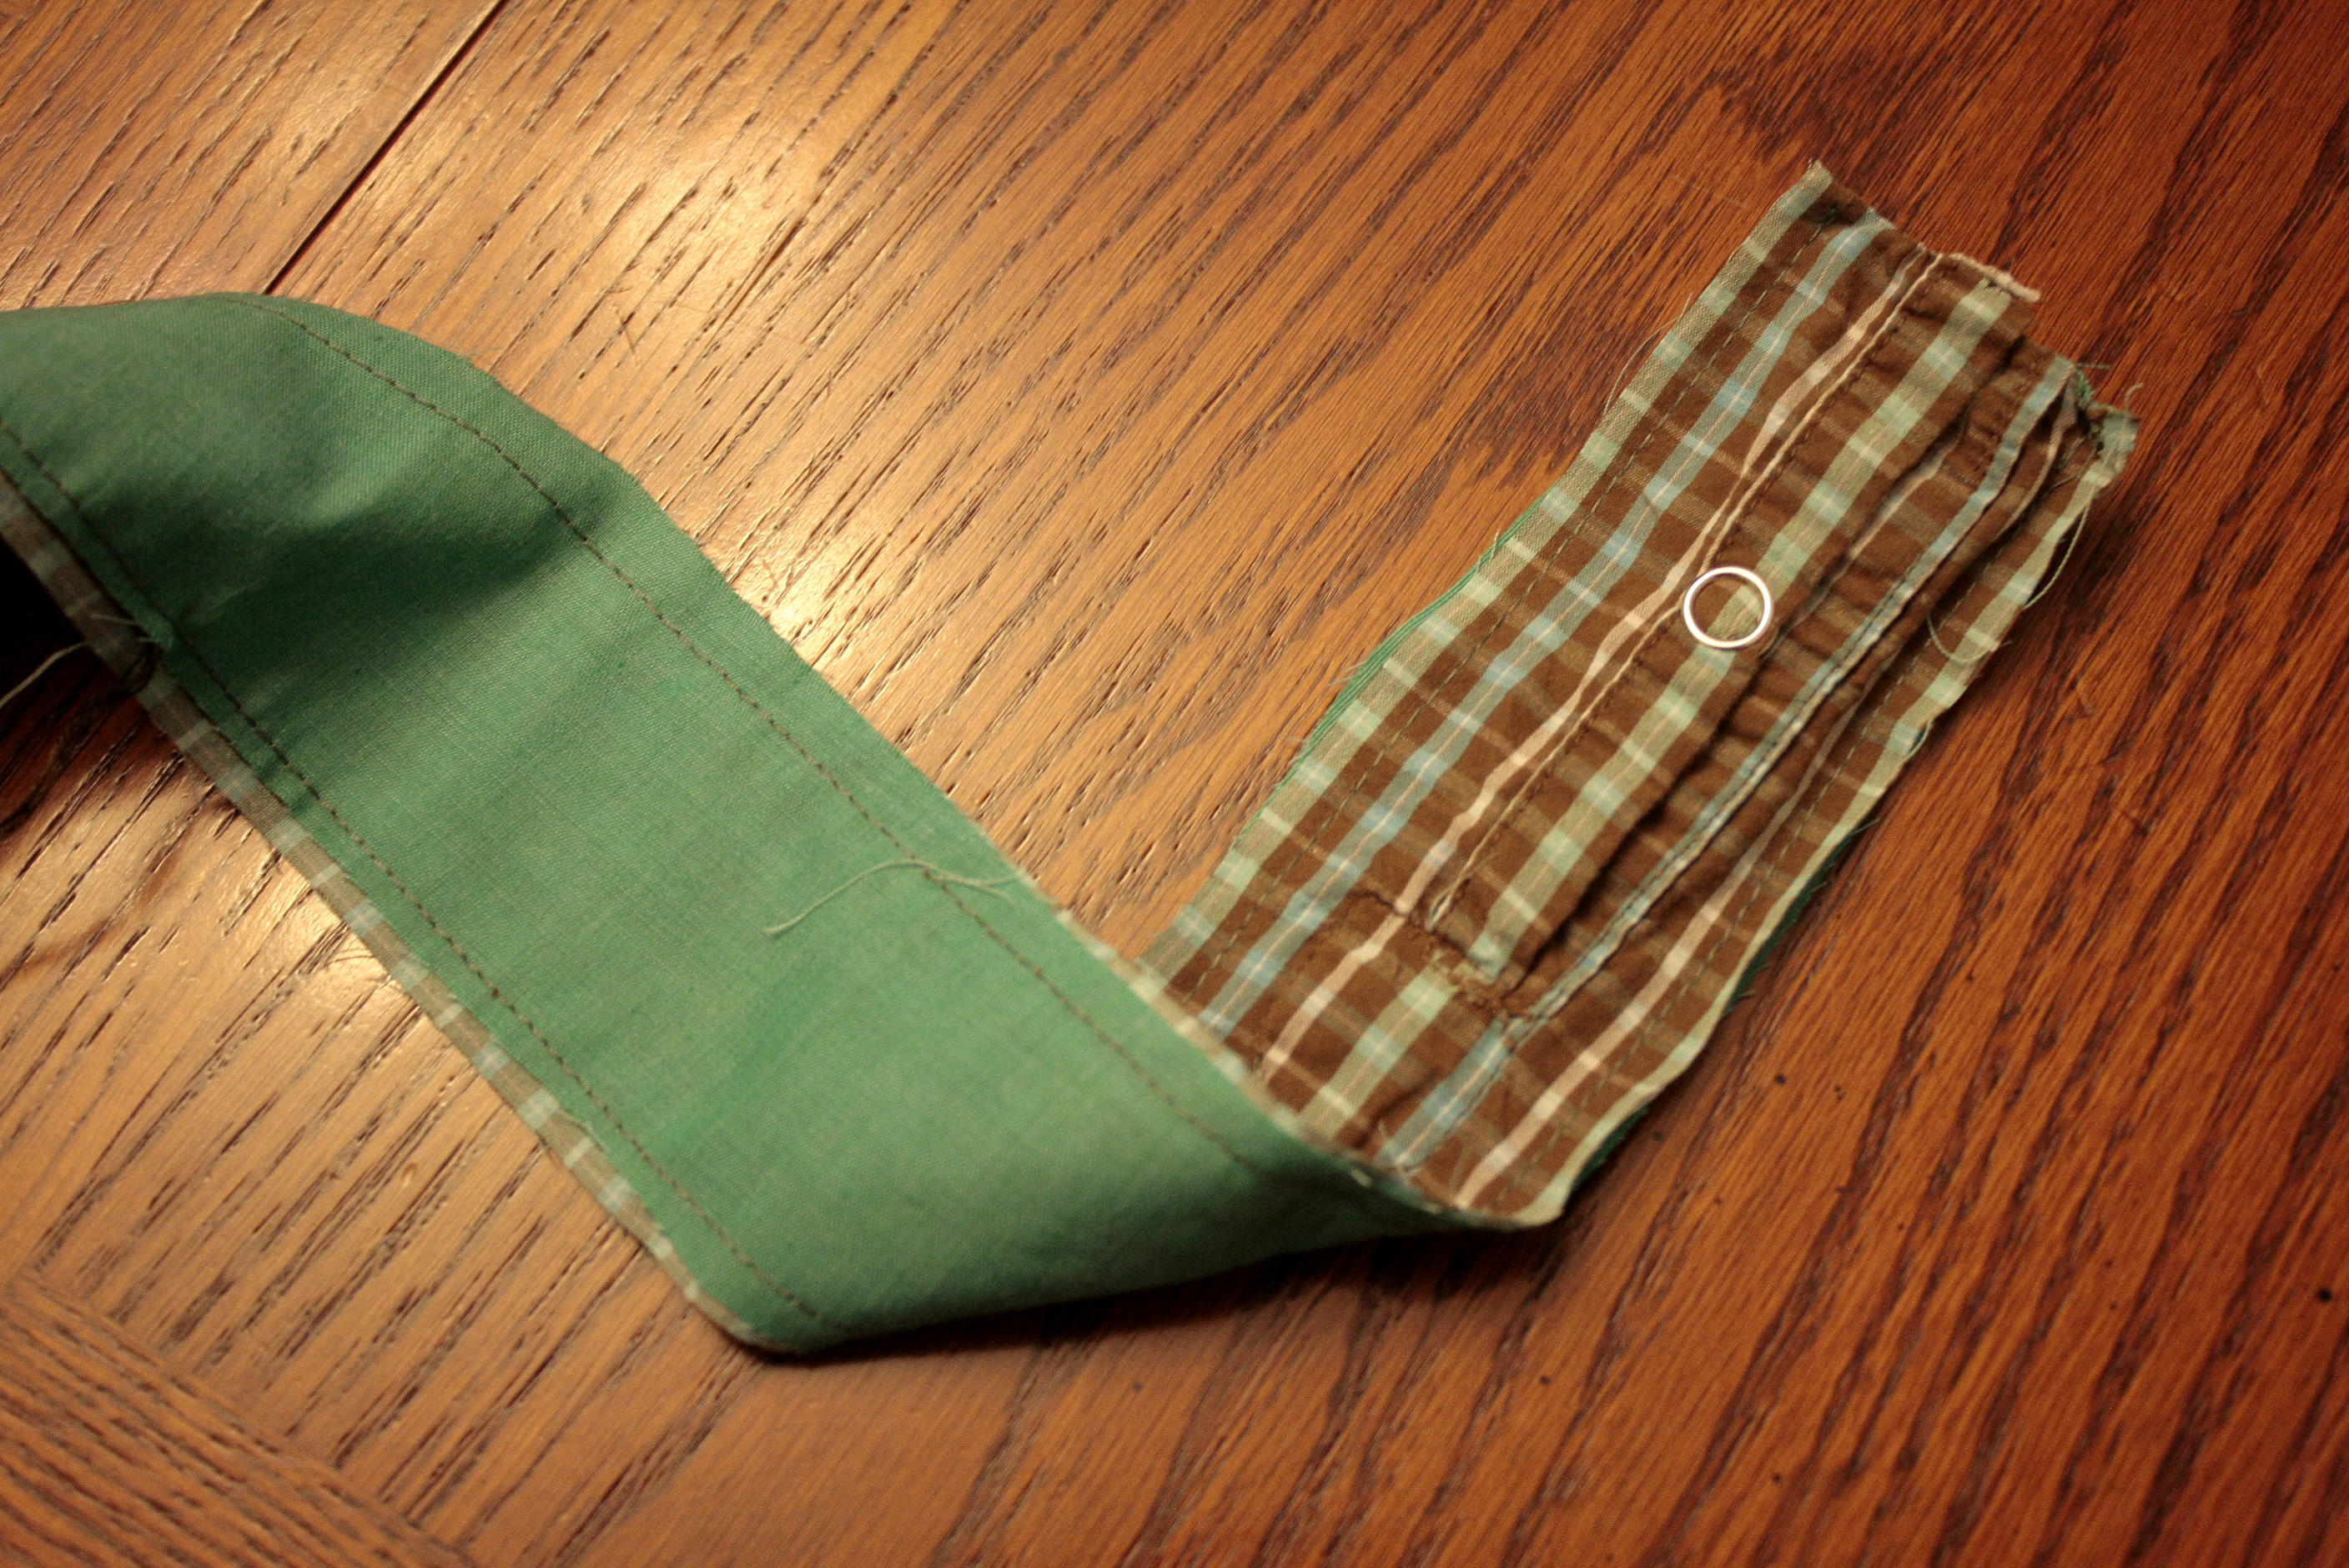
Now get the strap ready. First sew the strips together at the centers so you have a single long strip from the shirt fabric and from the liner fabric. Then sew them together with right sides together (shown below). Turn right side out. Hem the bottoms or fold under. Then sew the strap to the bag with an X inside a square.
For the wallet you'll cut off both cuffs from the shirt and open them up. Line up the raw edges of the two cuffs and zig zag stitch them together. Cut a 1" strip of fabric for the contrasting stripe and iron the long edges under 1/4". Sew it to the center to cover up the zig zag stitching/raw edges of the cuffs. Then fold up about 2/3 of the bottom of the wallet and stitch down the sides. The snaps from the shirt act as the closure.


And here's a few more shots of the finished set!


* This is a free pattern designed only to give you a guideline as to how I made this upcycled purse. All shirts are different so there are no guarantees yours will turn out exactly like this one. Please use the pattern at your own risk. 

Friday, March 18, 2011

Easy Drawstring Tote


I made this tote to match the number bean bags from this post. They're just so cute together I can't resist posting a photo here of the whole set!


I wanted to do a separate post for the tote since it's such a versatile thing to make and it was really fast to whip up. Plus it's easy enough you could even make them to use as gift bags!

To make your own, first cut two rectangles, one for the front and one for the back. You'll be folding this in half later so take that into account when you decide on a size. For the bean bag tote I used a 23" x 13" rectangle. Put right sides together and stitch all the way around but leave a 3" opening.


Turn right side out. Next, use an iron to crease the edges of the opening so that the raw edges are inside. Then fold the top over 1 1/4" and iron that down. Put a drawstring inside the opening then pin down the edge. Stitch along the edge with a 1/8" seam allowance.


Fold in half so you're seeing the side that you want to be the inside. Stitch around the bottom and the open side, stopping 2" before the top.


Attach the drawstring toggle.


Turn right side out.


Ready to fill with goodies!

Saturday, February 5, 2011

Appliqued Baby Onesies


A friend had a baby shower last weekend and I was so excited to make something for her and her little boy! I decided to do a set of embroidered baby onesides along with a combination changing pad and diaper pouch.

I found this great set of onesies at Old Navy just a couple weeks ago. They were available in blues, pinks and neutrals. I liked that they had a little bit of a design and contrasting piping around the edges without having so much going on that they'd distract from my applique. The fabric is from the Dwell Studio line at JoAnns and is a heavier home decor weight.


Check out my other post on how to make an applique if you need some guidance.

Basically I followed those instructions and then finished off the design by stitching around each image. I couldn't decide on a straight stitch or a zig zag and actually ended up doing both. For some of the trickier turns I had to turn the sewing maching wheel by hand or go very slowly. I also had to put the needle down and raise the foot to turn the fabric around quite a bit. If you click on the photo below you can see a larger version of it where you can see the stitches better.


And they're ready for the baby shower. Now they just need a chubby little baby in them!


And if you need more ideas, you can find my instructions for a matching diaper pouch and changing pad here!

Sunday, January 30, 2011

Tutorial: LOVE Shirt

My sister visited this weekend and we decided to make her a shirt for Valentine's Day based on the LOVE statue in Philadelphia. If you need more instruction, I'll do a more detailed tutorial on how to make an applique later this week so this one will be a bit more brief.


First I ironed Wonder-Under (specifically Pellon 725 Heavy-Duty Wonder-Under Transfer Web) to the back of the fabric we chose. Then I traced the letters onto the fabric using a stencil we had created of each letter. You can download the PDF of the letters for personal use here. Then we cut out each letter, peeled off the Wonder-Under backing, positioned the letters onto the shirt then ironed them down. Then I did a zig zag stitch around each letter and project complete! We found the plain long-sleeved gray shirt at Target in the men's section. They had a variety of colors and they had a few in the boys section if you need a smaller size.

Here's a close up of the letters. We chose a navy quilting cotton for the L, V, and E. For the O we used a fabric with tiny forks, spoons and knives. My sister is loves to bake (she's fabulous by the way) and she's single so this shirt is subtly dedicated to food love.

Friday, January 14, 2011

Tutorial: Totes Big and Small


It seems like I'm always leaving the house with something...dinner for a friend, toys for my toddler, extra pair of shoes or who knows what. I usually grab a Bath and Body Works bag or a plastic mega-store bag but in the interest of looking less "mom-frump" (my term for how I often feel these days) I thought a nice set of tote bags would help me look a bit more pulled together. Here's the first tutorial in the series on some different tote styles. Later I'll do a second one on a version with a pocket and different handle straps.

You can scale the size up or down for whatever purpose you have in mind. I make two sizes generally. One is a small tote the same size as one of the paper Bath and Body Works bags you get at their stores. It's great for a few toys, extra shoes, or even wrapping up a gift. The larger size is great for grocerices, farmer's markets, extra toddler clothes/toys when going out for the day, as a beach bag, for a change of clothes for the gym or whatever else you can think of. It's about the same size as a paper grocery bag.

For this pattern you'll need an outer fabric and a liner fabric. I like at least one of the fabrics to be a heavier weight to help the bag hold it's shape a little better. All seam allowances are 1/2" unless otherwise noted.

1. Small size: Cut out a 15" square from both of your fabrics. At each of the bottom corners cut a rectangle 2 1/2" tall by 3" wide. If the fabric you're using doesn't allow you to have the fold at the bottom you'll cut a rectangle 15" wide by 15 1/2" tall, and your corners will be 3" square.
Large size: Cut out a 20" square from both of your fabrics. At each of the bottom corners cut a rectangle 3" tall by 3 1/2" wide. If the fabric you're using doesn't allow you to have the fold at the bottom you'll cut a rectangle 20" wide by 20 1/2" tall, and your corners will be 3 1/2" square.

2. Turn your fabrics right sides together then stitch the sides.

3. If you have a raw edge rather than a fold at the bottom, stitch that together.

4. Create the bottom of the bag by stitching the corners. See below for photo detail. You'll stitch all 4 corners (the 2 for the outer fabric and the 2 for the liner).


5. Your outer fabric and liner should now look like this and you can iron the seams flat.


6. Now flip the outer fabric right side out, then nestle the liner inside.


7. Now pin along the bottom of the bag on the front and back, but not the sides. Stitch along the edge with a 1/8" or 3/16" seam allowance.


8. Fold the raw edges of the top of your bag in 1/2" and pin. Also, tuck the straps about 1" down in between the two fabrics and pin in place. I used these cotton straps from JoAnns but you could also make them out of a coordinating fabric. For the small bag each strap is 14". Fot the large bag I wanted something I could carry by hand or over my shoulder so it's 26".


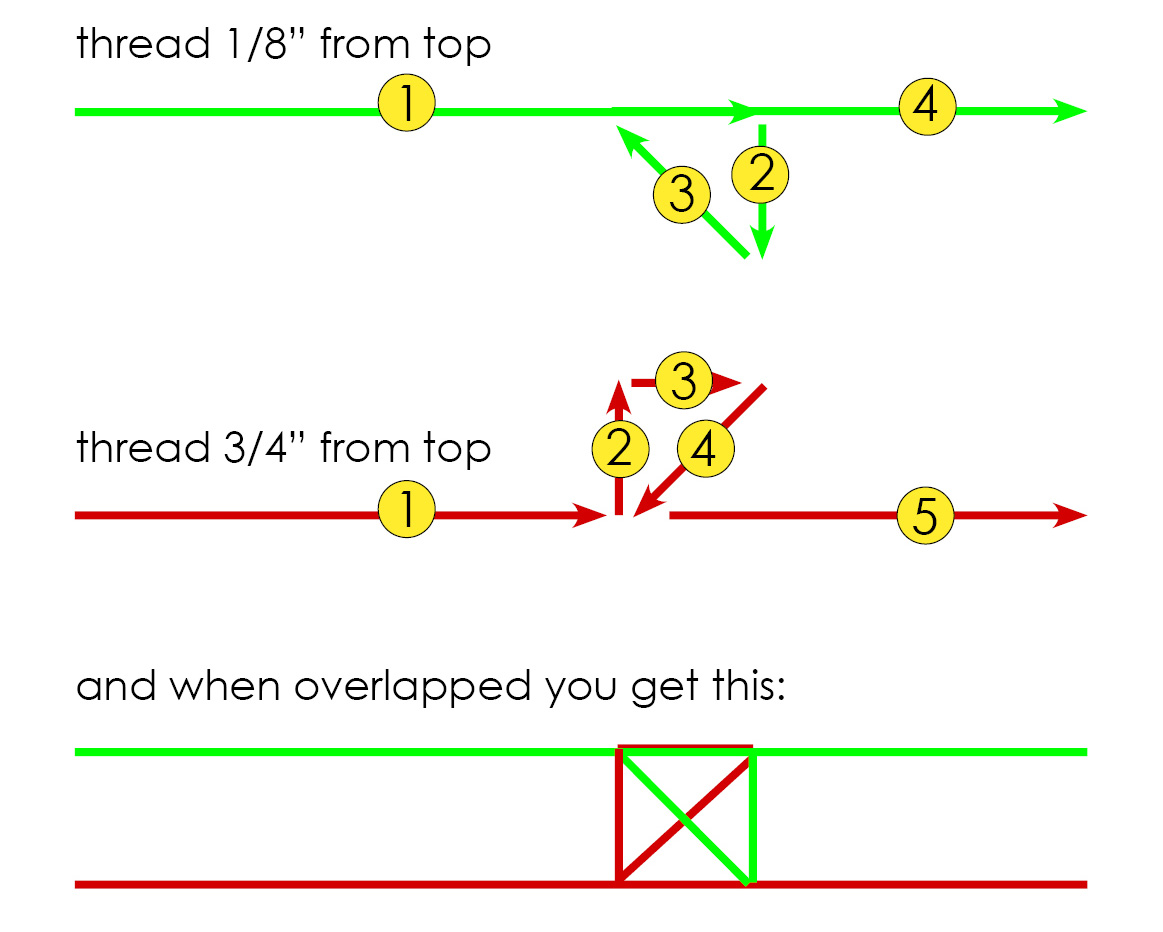
9. Now stitch around the top. Leave a 1/8" seam allowance at the top and then sew a second seam 3/4" down from the top. Then go back and put an X over each strap. Or if you don't want to have to go back and do the Xs later, see the diagram below for the exact steps I followed.


10. Optional: If you want your tote to have a boxy shape, pin the 4 sides going straight up from each corner then stitch 1/8" in from the edge like you did in step 9 around the top.

And now your project is complete!

Wednesday, January 12, 2011

Tutorial: Sink Skirt


This project starts with a little story. Five years ago my husband and I bought an old historic home. It was built somewhere in the mid- to late-1800s. The house had been empty for a couple years and raccoons used it for part of that time. We had this little gross closet (see left photo above) that I wouldn't store anything in so my dad suggested we turn it into a bathroom.


I'll spare you the drama of putting in the bathroom, but we ended up with the little beauty in the above right photo! You can see that the pipes under the sink are still visible. That brings us to this project. A sink skirt was the perfect solution to hide those pipes and add some extra character.

MEASURING:
Width: I started by measuring around the top of the sink. I then added 1" to that measurement so I could hem the sides. I decided to use 5 box pleats around the top. For each pleat I added an extra 4" (you'll loose 2" for each side pleat). This bathroom is 3 feet x 5 feet so that sink is super small. For a larger sink you may want more pleats.

Height: Measured the height I wanted the skirt from the rim of the sink to below the pipes. Added an additional 4" for hemming.

SEWING:
After cutting out my fabric I hemmed the left and right sides. Then in the center I pinned down a box pleat. Each pleat is 2" wide with 1" pleats so the folds will almost touch in the back. From there I pinned each of the two side pleats. Then I sewed a seam across the top to hold them all in place. I then folded the top back 1" twice for the hem. The extra wide and sturdy hem will be where you later place your velcro.

I did the same process for the bottom except for making the pleats larger to the point that they overlapped each other.


FINISHING:
After I had the skirt finished, I used sticky velcro squares and attached one side to my sink and one side to my sink skirt. The ones on the sink stuck really well but the ones on the fabric lost their hold when the unheated bathroom reached arctic temperatures. After that I handstitched the squares to the fabric but the stickyness made it nearly impossible to push the needle through and now my finger is full of holes. You can benefit from my suffering: I would recommend sticky velcro for the sink and nonsticky velcro stitched to the fabric. I used 5 squares, but again, it's a really small sink so you may need more. Now it's ready to be attached and you're all done!