click map Home Tutorials About FAQ

Thursday, July 14, 2011

Accuquilt GO! Baby winner!

The lucky winner of the GO! Baby plus 3 dies was Mary, comment #356 chosen by random.org! If you're not Mary, keep reading for more chances to win.

Mary has her own fabulous blog that you can find here. Judging from what's on her blog, I'm sure she'll make great projects with her GO! Baby. Mary, I've sent you an e-mail with more details.

Giveaway

For the rest of you hoping to win a GO! Baby, check out the giveaways page on my other blog Craft Buds. There's currently 6 GO! Baby giveaways listed (but hurry, 3 end today!).


In other news, I'll be attending the Craft and Hobby Association trade show next week in Chicago. Stay tuned for news on upcoming craft trends, projects, and maybe even some giveaways!

Sunday, July 10, 2011

Hexagon Fabric Flowers


I'm still playing around with the GO! Baby dies and had fun doing this quick little project making flowers. (Side note, if you want to enter to win a GO! Baby and 3 dies, enter here!) I used the hexagon die that cuts  2", 3" and 5" hexagons and used knit fabric to avoid fraying. I also put together a PDF template you can download here to use to cut out the hexagons. If you have trouble printing the PDF, go to File, then Download the file and then print it.

To make a flower just fold each corner to the center of the hexagon. I went in a clockwise direction around the whole hexagon. You can either hold them in place with your finger and then stitch it together at the end, or sew down the layers as you go. After all the "petals" are secured, just add a decorate button and you're finished!


I made a grouping of the three sizes. They're great for embellishing headbands, necklaces, shirts, and bags!

Wednesday, July 6, 2011

Giveaway! Accuquilt GO! Baby Fabric Cutter!

** Comments are closed and a winner has been chosen. Thanks to everyone who entered! Stay tuned for more tutorials and giveaways. **

Last week I posted my review for the GO! Baby along with a tutorial. Were you wishing you could have a GO! Baby too? Well now's your chance! Accuquilt has generously allowed me to giveaway a GO! Baby along with three dies of the winner's choosing.


You've got 3 ways to enter. Just leave a separate comment below for each that you do:

1. Become a follower of Bugglebee through Google Friend Connect, RSS, or e-mail.
2. Blog, facebook, or tweet about this giveaway. Here's a sample tweet you can copy:
#Win an Accuquilt GO! Baby fabric cutter and 3 dies by entering the craft / sewing #giveaway @BuggleBHandmade. http://tinyurl.com/3jdzrdk
3. Sign up for the Accuquilt e-mails (plus you'll get 22 free patterns!).

This giveaway is open internationally and will close at 11:59 pm EST on Wednesday, July 13. The winner will be chosen by random.org. They will be announced on this website and also contacted by e-mail. Just make sure your e-mail is linked in your profile or leave it in your comment, otherwise I'll have to pick a new winner!

22 Free Patterns - Download Now

Saturday, July 2, 2011

Rosette Ruffle Pillow


This pillow is the first project I made using the Accuquilt GO! Baby I was sent to review. I cut the following with the 2 1/2" strip cutter die on the GO! Baby:
  • Eight strips 2 1/2" wide by 13" long (the orange edging)
  • Two strips 2 1/2" wide by 64" long (the pink rosette)
For the long strips I folded my fabric in half, then in half again so I had a 16" length. You could also cut the strips with scissors or a rotary cutter.

Other materials: 
  • 3" circle for the center of the flower
  • Large button (mine is 3/4")
  • Two 11.25" squares for the center of the front and back (the brown with white polka dots in my pillow)
To get started, lay out one of your center sqaures. Start with one of your strips for the rosette and form a circle with 1/2" border away from the edge of the square and spiral inwards. To create the circle, add a pleat every 1 1/2 or 2 inches. I didn't want mine to be perfectly precise pleats so I just added the pleats as I went without measuring. The 1 1/2 to 2 inch measurement is on the inside of the spiral where the orange star is in the top left image below. Pin the pleats in place as you go. Where the strips ended, I folded the edge under 1/2" so it would just look like another pleat (top right photo).


Start sewing around the center and spiral your way out. As you sew leave 1/2" seam allowance. Fold the fabric you have already sewn away from the foot to avoid sewing down multiple layers.

Here's what the back looked like after I finished sewing the spiral.

When I measured the stitches on the back of the fabric, the largest part of my spiral was 6" and the width between rows at the outer edge was 1 1/4" and narrowed as I got to the center of the spiral. Here's an illustration of what the stitching looked like on the back of the fabric:
After the rosette is sewn down you'll add the border. Sew on one strip at a time as shown in the diagram within the photo below (the photo shows the front with just 2 of the 4 strips attached). Sew 4 strips to the front square and 4 to the back square with a 3/8" seam allowance.
Next, place the 3" circle in the center and sew it down with the button in the middle. I added a few pleats to the center circle as I was hand sewing on the button.
Put right sides together and sew all the way around the pillow with a 3/8" seam allowance, leaving a 4" opening.
Turn the pillow right side out and stuff with fiberfill. You could also modify this to use a pillowform. Hand stitch the opening closed. The final exterior measurements are 14" square.

Accuquilt GO! Baby Review

Last week I was ecstatic to receive an e-mail from Accuquilt asking if I'd like to review their GO! Baby fabric cutter. I had my choice of 3 dies to go with it and earlier this week look what arrived in the mail!


I chose to receive dies for 2 1/2" strips, a set of 2", 3", 5" hexagons, and a set of triangles. Accuquilt also included 2 corresponding cutting mats for me to use with the dies.

Specs
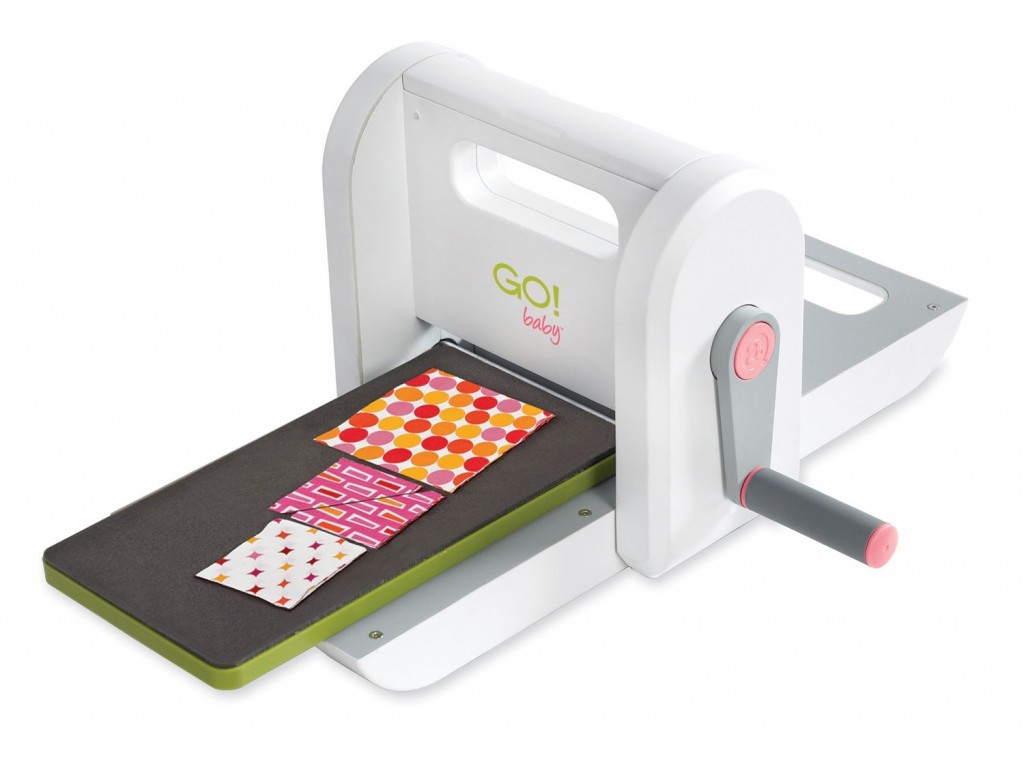
The machine is about the size of a small waffle iron and weighs about 8 pounds. The dimensions are 12" W x 4.5" L x 8.25" H, so it's very portable and easy to store. The dies I recevied are 6 3/8" wide. The hexagon and triangle dies are 12 1/4" long and the strips die is 24 1/4" long. The dies will never dull and the cutting mats can handle hundreds of cuts. When one side of the mat wears out just flip it over and use the other side! You can cut up to 6 layers of fabric at a time. The photo below shows the open machine with the hexagon and triangle dies. The green side is a hard plastic and the gray/black side is a dense foam.


Getting Started
To get started you just open up the two sides of the GO! Baby. Then place your die foam side up. On top of that stack your fabric and then your cutting mat. Place the stack into either side of the GO! Baby, turn the handle and run it all the way through. The handle turns smoothly and the whole process is fast and easy. Literally, in less than 15 minutes from the moment the UPS man set it on our porch I had a pile of perfectly cut strips of fabric.


In the photos above I cut knit fabric and the GO! Baby handled it like a pro. The best way I can describe the dies are that they are like a dense sponge with a cookie cutter (the blade) hidden inside. When you roll the die through the machine it presses the cookie cutter through your fabric and cuts it. I didn't have any loose threads or ragged edges. I found that I could even leave a bit of fabric hanging out the sides but it did cut better when I trimmed the fabric to the size of the die. If you run your hand over the dies you don't feel any sharp edges and the die blades are completely hidden within the foam.

Strip/Hexagon/Triangle Dies
The strips die is open ended so you can fold your fabric and run it through the cutter and have very long strips. These strips would be perfect for quilt binding. The hexagon die is pretty straightforward, no special information needed. The triangle die is at a slight angle which, according to the Accuquilt website, ensures a better cut. Accuquilt recommends that you align your fabric to the blade rather than the die itself. To make it easier they suggest using a permanent marker to outline the blades. The triangle die already has the corners clipped which is another great timesaver!
And since I showed the strips above, here's my other two dies.

More Information
If you want more information, you can visit the Accuquilt website or check out their You Tube video demonstrating the GO! Baby.

Final Thoughts
Even though I'm not a quilter I can still see myself using this a LOT. I think if you're a quilter this may be the best thing that's ever happened to you. I've never quilted because precisely cutting so many small pieces of fabric just sounded too indimidating and time consuming. With the GO! Baby I might be ready to give it a try!

If you're interested in purchasing from Accuquilt, they offer the GO! Baby which I tested. They have nearly 60 dies available. For even more options and quilty fun, check out the Studio Fabric Cutter with over 350 dies and it cuts up to 10 layers of fabric.

If you'd like to stay up to date with Accuquilt and their great products, use the link below to sign up for their e-mails and you'll receive 22 free patterns!

22 Free Patterns - Download Now
And lastly, if you were wondering what I did with those pink strips of fabric, I made this Rosette Ruffle Pillow! The tutorial is here. I'll be posting tutorials soon using the hexagon and triangle shapes.


Wednesday, June 22, 2011

Pillowfight for a Cause

Ladybird LnYou may have heard some of the bloggy buzz about the ladies over at Landybird Lane. Right now they're hosting a "pillowfight" where you can link up any pillow related post from your blog. For each link you add they're asking that you donate a homemade pillowcase. You can donate the pillowcase to a local hospital or women's shelter or you can send it in to them. If you send your pillowcase to them, they'll give it to their friend, Malynn, to donate to Primary Childrens Hospital in Salt Lake City.

Malynn is the mastermind behind this idea. She's 14 years old and a talented seamstress. She's been in and out of the hospital for the past 6 months and had a homemade pillowcase at the hospital with her. To brighten up the rooms of other patients and give them a more home-ey feel, they're hoping to get 100 pillowcases for Malynn to donate.

To help out with the cause, I made these two pillowcases.


I made the light pink and dark green stripes out of 1/2" double fold bias tape that I opened to 1" and ironed flat.


The edge of the pillow is made from a 10" strip that I folded in half so you would still see finished material from the pillow opening. Below you can see the inside (left) and the outside (right) of the edge of the pillow. I was able to hide some of the seams under the bias tape and any exposed raw edges I stitched up with my overcast foot to avoid fraying.


They're also giving away some amazing prizes as part of the pillowfight! They're accepting entries through midnight tonight here.


Tuesday, May 31, 2011

Upcycle: Shirt to Purse


Some of you may recognize the top shirt/purse as my final project from One Month to Win It, a sewing/crafting contest that I won in April! I love the little details in clothing so I used those details in my purse patterns. You can find the pattern for the pink shirt/tote over at Craft Buds. I've uploaded a free PDF pattern* for this purse here. The pattern is 2 pages. You'll want to print both pages out, line up the dots and tape them together. For some reason, in my browser the PDF preview shows the pages are cropped but once I download it, it shows correctly.

For this bag you'll need:
  • one long-sleeved western style shirt
  • 1/2 yard fusible fleece
  • 1/2 yard fabric for the liner (I used a heavier weight home dec fabric)
To get started, assemble all the pieces in the photo below including:
  1. Two pockets from the front of the shirt
  2. A 6 1/2" x 9 1/2" rectangle for the inner fabric including the buttons from the front of the shirt
  3. 12" (or longer) zipper
  4. Four strips total of 18" x 2 1/2" fabric, one strip cut from each of the two shirt sleeves including the button, and two strips from the liner fabric. (Using these measurements, the final sewn and attached strap will be around 34" long x 2" wide so feel free to adjust as necessary if you'd like a different length/width. If you're using a lighter weight fabric shirt and/or liner, you may want to add strips of the fusible fleece to the inside of the strap for extra reinforcement.)
  5. Use the pattern to cut pieces from the top back and lower back of the shirt for the main body of the bag.
  6. Use the pattern to cut two pieces of fusible fleece.
  7. Use the pattern to cut two pieces of the liner fabric.
  8. Save the cuffs for a wallet (pictured near the end of the post).

First you'll get the pockets ready. Sew the pockets to one of the exterior pieces (left photo). I sewed across the top, then pinned the flaps up and sewed the sides and bottom. For the inner pocket (right photo), hem the edges of the rectangle and sew it to one of the pieces of fabric for the liner.


Iron the fusible fleece to the shirt fabric. Iron the top of the piece down 3/8" to help later with the zipper installation. It's optional if you want to stitch it down.

Then with right sides together sew the bottom and sides shut.


Then pinch together the bottom corners (left photo below) and sew them shut. Pinch together the top corners (right photo below) and sew together, sewing down your folded or hemmed edges from the step above and leaving a 1/4" gap where you'll be adding the zipper soon.


Follow the same instructions for the liner. Then nestle the liner inside the outer pieces. Now pin the zipper in place between the two layers and stitch along the sides using your zipper foot. (The left photo below shows raw edges, but in your version you should have either ironed or stitched the raw edge two steps ago.)


Now get the strap ready. First sew the strips together at the centers so you have a single long strip from the shirt fabric and from the liner fabric. Then sew them together with right sides together (shown below). Turn right side out. Hem the bottoms or fold under. Then sew the strap to the bag with an X inside a square.

For the wallet you'll cut off both cuffs from the shirt and open them up. Line up the raw edges of the two cuffs and zig zag stitch them together. Cut a 1" strip of fabric for the contrasting stripe and iron the long edges under 1/4". Sew it to the center to cover up the zig zag stitching/raw edges of the cuffs. Then fold up about 2/3 of the bottom of the wallet and stitch down the sides. The snaps from the shirt act as the closure.


And here's a few more shots of the finished set!


* This is a free pattern designed only to give you a guideline as to how I made this upcycled purse. All shirts are different so there are no guarantees yours will turn out exactly like this one. Please use the pattern at your own risk.